C++ Object Oriented Programming 1

引言

本文涵盖C++对象模型、关键机制、优良编程风格、内存管理,让读者从一无所知到具备大家风范,让读者对于C++有更深入的理解和体会,彻底掌握C++的面向对象与底层运作。

C++ 编程简介

你應具備的基礎

  • 曾經學過某種 procedural language (C 語言最佳)

    • 變量 (variables)
    • 類型 (types) : int, float, char, struct
    • 作用域 (scope)
    • 循環 (loops) : while, for,
    • 流程控制 : if-else, switch-case
  • 知道一個程序需要編譯、連結才能被執行

  • 知道如何編譯和連結(如何建立一個可運行程序)

我們的目標

  • 培養正規的、大氣的編程習慣

  • Object Based (基於對象)

    以良好的方式編寫 C++ class

    • class without pointer members — Complex
    • class with pointer members — String
  • Object Oriented (面向對象)

    學習 Classes 之間的關係

    • 繼承 (inheritance)
    • 複合 (composition)
    • 委託 (delegation)

你將獲得的代碼

  • complex.h

  • complex-test.cpp

  • string.h

  • string-test.cpp

我们将实现复数和字符串的例子。

C++ 的歷史

  • B 語言 (1969)
  • C 語言 (1972)
  • C++ 語言 (1983)
    (new C -> C with Class -> C++)
  • Java 語言
  • C# 語言

可以看到 C++ 是以 C 语言为基础的面向对象语言,是第一个被全世界广泛接受的语言。

C++ 演化

  • C++ 98 (1.0)
  • C++ 03 (TR1, Technical Report 1)
  • C++ 11 (2.0)
  • C++ 14

C++ 1983 年就有了,但正规化在 1998 年。上面加粗部分是大版本更新正规化,目前业界大部分程序员是 C++ 11/14(录课时是 2015 年,比较流行的是 C++ 98/11),出现了许多新的工具和特性。

我们学习 C++ 可以分为语言部分和标准库部分,基本所有的编程语言都是这样把这两个分开,使用标准库也是非常重要的事情,本文主要讨论语言部分。

書目誌
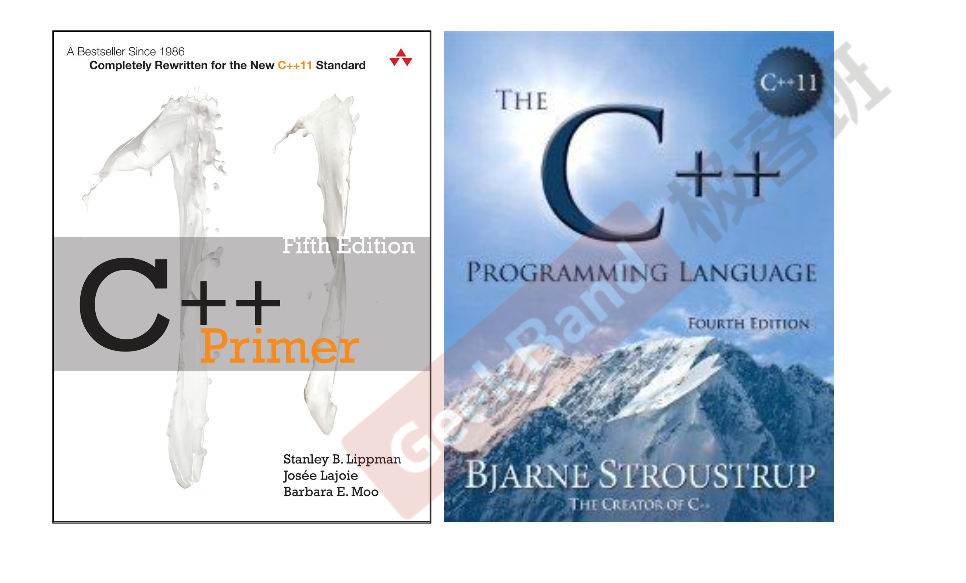
在语言部分这两本书可能是全世界卖得最好读者最多的 C++ 百科等级的书籍。
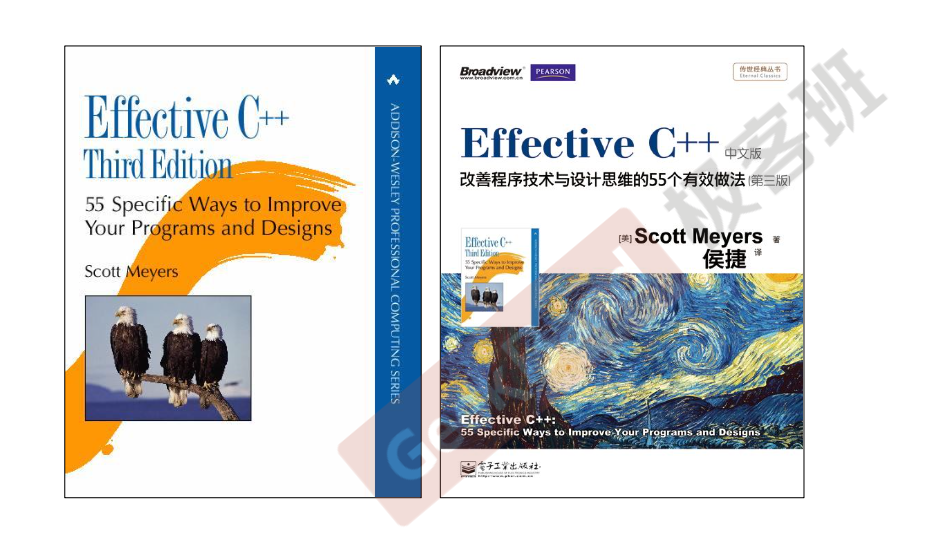
我们学了语言之后很希望得到专家的建议,这本书以调侃的方式告诉你什么该做,什么不该做,做什么样的动作会影响什么样的效率,这是专家给我们的意见。
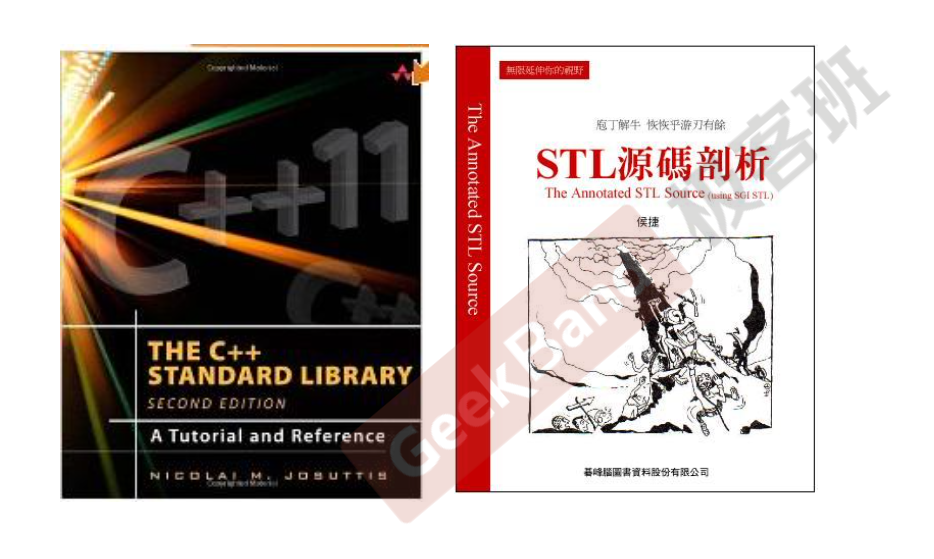
刚才提到语言,C++ 除了语法本身另外还有标准库。标准库很庞大,我们需要好的书籍帮助学习,上面两本书可以帮助你。

头文件与类的声明

C vs. C++, 關於數據和函數
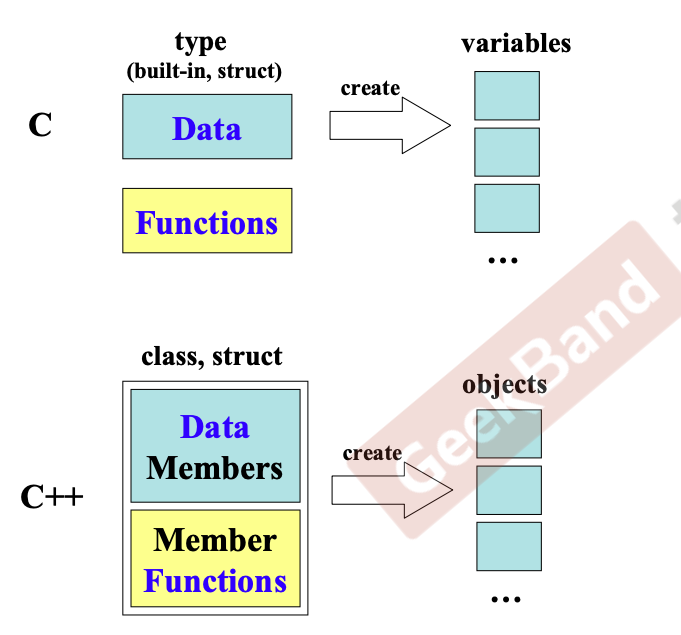
在 C 语言设计程序的时候,我们会准备一些数据和函数(用于处理数据)。由于语言没有提供足够的关键字,这些数据一定是全局的,对后面有很大影响的。

面向对象语言如 C++ 的想法是把数据和处理数据的函数包在一起,通过创建对象来使用,不会混杂在一起。
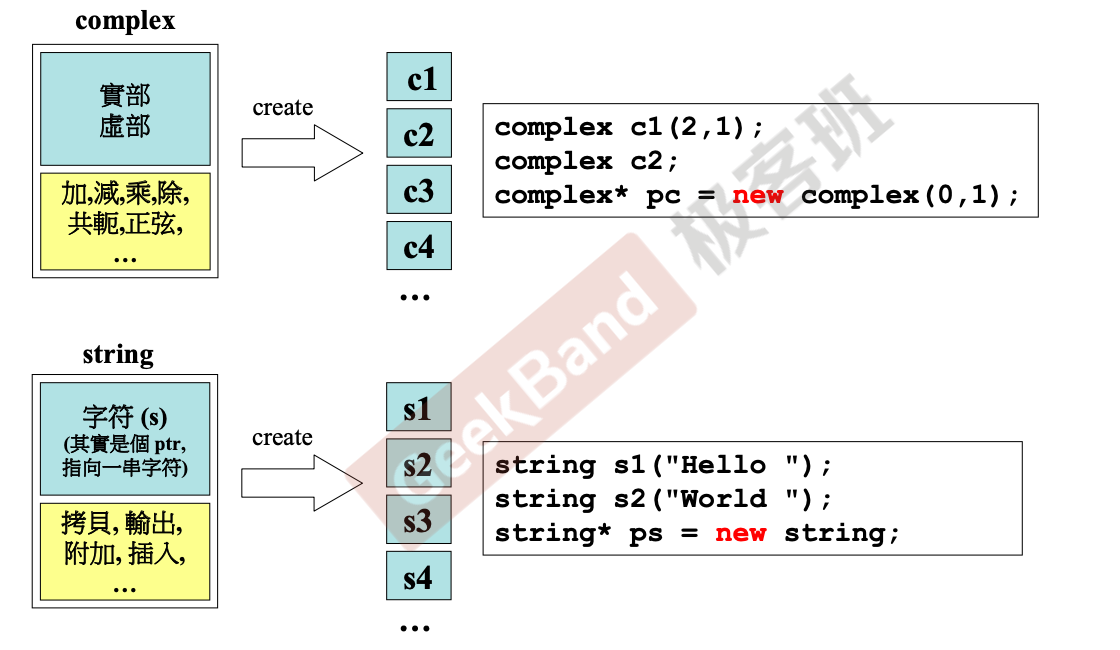
对于 Class 分类可以区分为是否带指针,这会影响后面的写法,最有代表性的就是复数和字符串。

Object Based (基於對象) vs. Object Oriented (面向對象)

Object Based: 面對的是單一 class 的設計

Object Oriented : 面對的是多重 classes 的設計, classesclasses 之間的關係

再次提醒,当一个类里包含指针时需要非常小心。

C++ programs 代碼基本形式
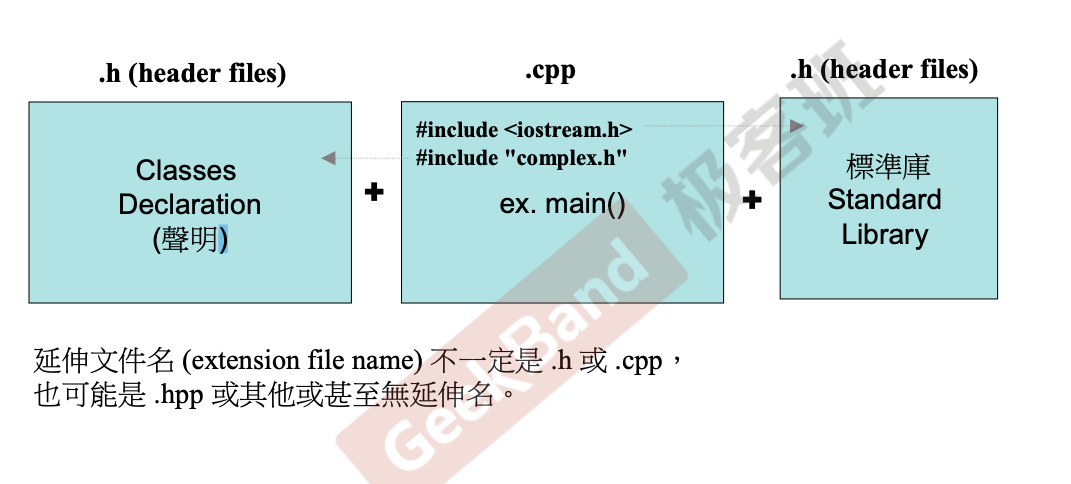
在我们正式写程序之前来谈谈 C++ 代码基本形式,一般而言会包含头文件、主程序。

Output, C++ vs. C
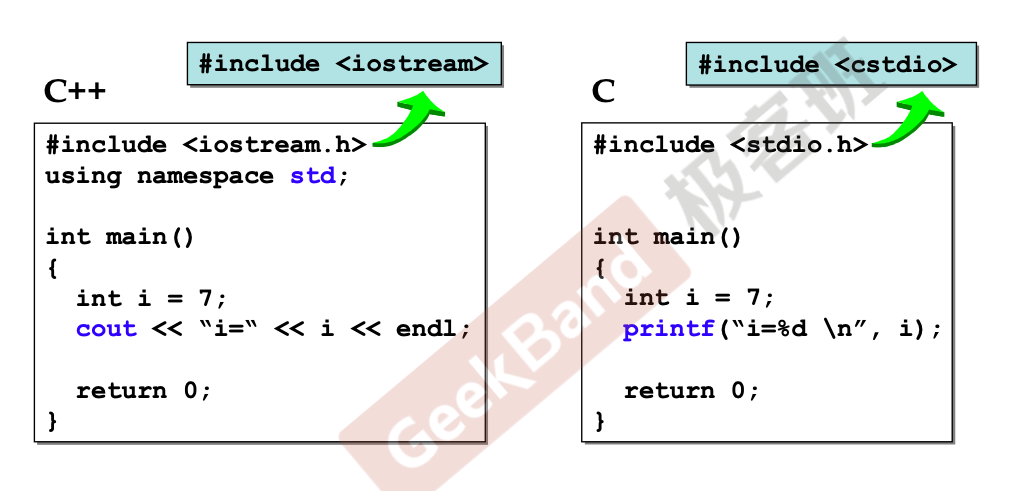
关于 C 与 C++ 的输出方式。

Header (頭文件) 中的防衛式聲明
1
2
3
4
5
6
#ifndef _COMPLEX_
#define _COMPLEX_

...

#endif

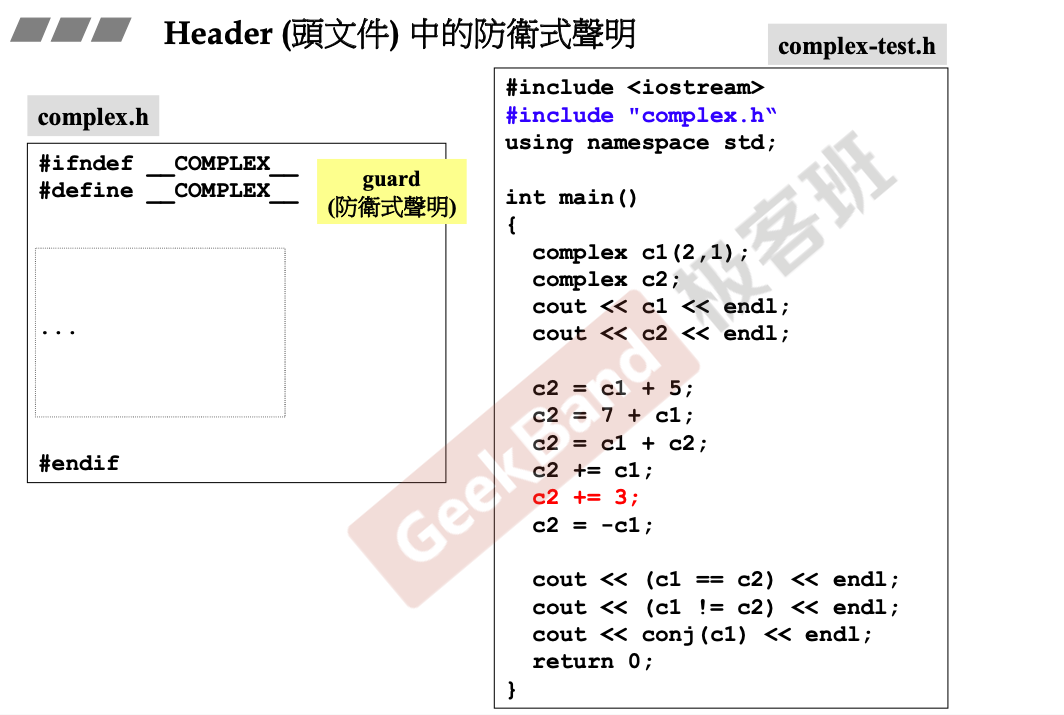
上面的防卫式声明告诉编译器一进来如果不曾经定义过 _COMPLEX_,那么就把它定义出来。

1
2
3
4
5
6
7
8
9
10
11
12
13
14
15
16
17
18
19
20
21
22
#include <iostream>
#include "complex.h"
using namespace std;

int main() {
complex c1(2, 1);
complex c2;
cout << c1 << endl;
cout << c2 << endl;

c2 = c1 + 5;
c2 = 7 + c1;
c2 = c1 + c2;
c2 += c1;
c2 += 3;
c2 = -c1;
cout << (c1 == c2) << endl;
cout << (c1 != c2) << endl;
cout << conj(c1) << endl;

return 0;
}

Header (頭文件) 的佈局

1
2
3
4
5
6
7
8
9
10
11
12
13
14
15
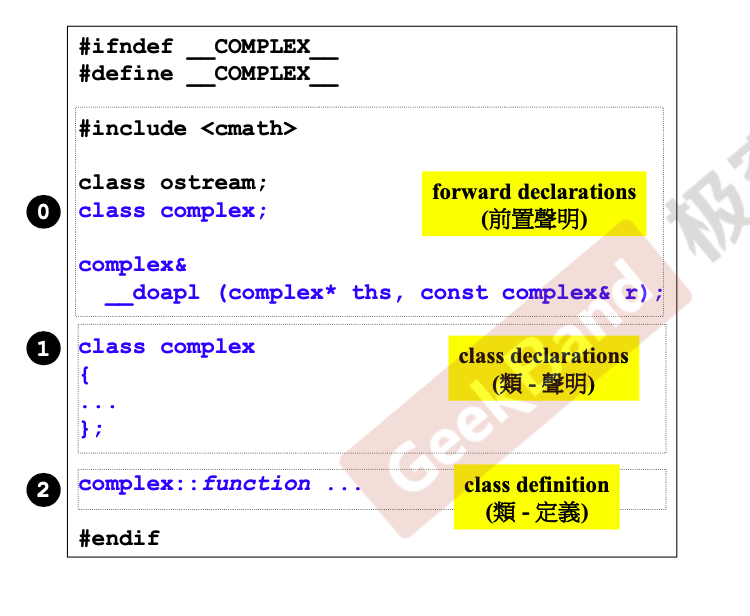
#ifndef _COMPLEX_
#define _COMPLEX_

#include <cmath>

class ostream;
class complex;

complex& _doap1(complex* ths, const complex& r);

class complex {

};

#endif

class 的聲明 (declaration)

1
2
3
4
5
6
7
8
9
10
11
12
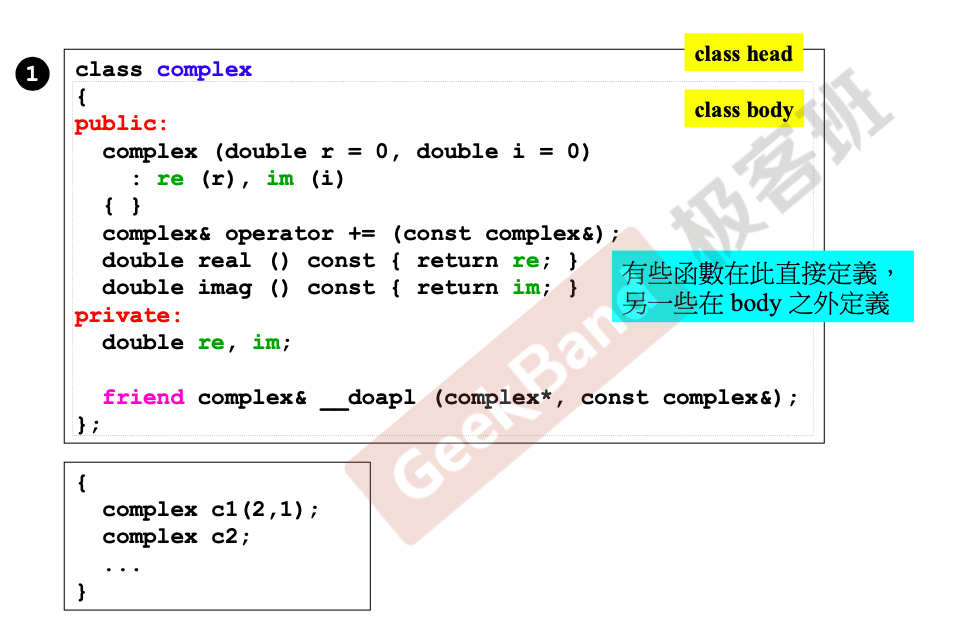
class complex {
public:
complex(double r = 0, double i = 0)
: re(r), im(i) {}
complex& operator += (const complex&);
double real() const { return re; }
double imag() const { return im; }

private:
double re, im;
friend complex& _doap1(complex* ths, const complex& r);
};

函数可以在类中或者类外定义。

class template (模板) 簡介

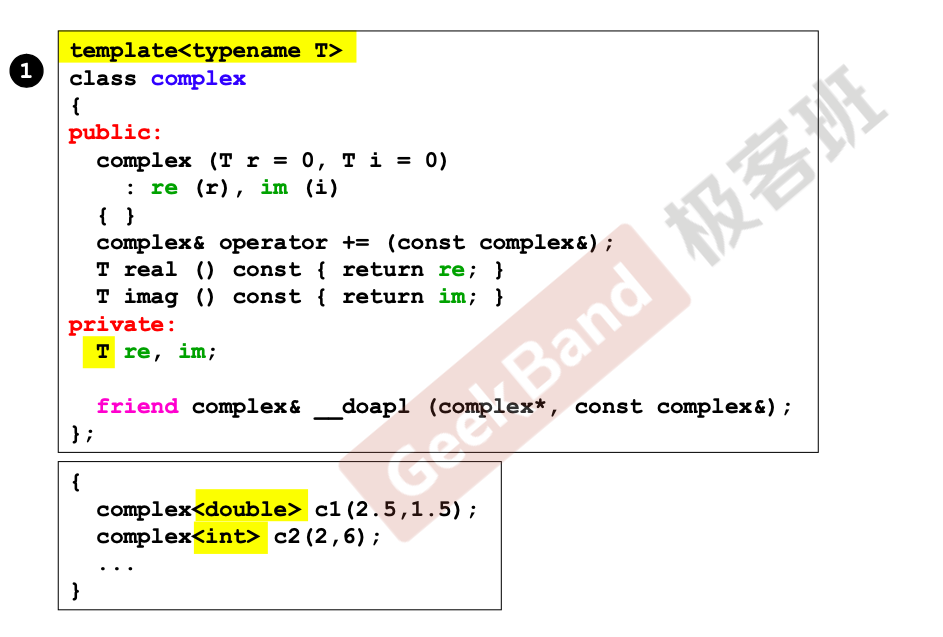
前面的 reim 都是 double 类型的,那么 intfloat 类型呢?如果我们只修改这个地方却要创建三个类岂不是非常不方便?这就是模板发挥的时候。

我现在的需求是把实部虚部的类型不要写死成 double,将来用的时候再去定义:

1
2
3
4
5
6
7
8
9
10
11
12
13
+template<typename T>
class complex {
public:
+ complex(T r = 0, T i = 0)
: re(r), im(i) {}
complex& operator += (const complex&);
+ T real() const { return re; }
+ T imag() const { return im; }

private:
+ T re, im;
friend complex& _doap1(complex* ths, const complex& r);
};
1
2
complex<int> c1(2, 1);
complex<double> c2;

构造函数

inline (內聯)函數

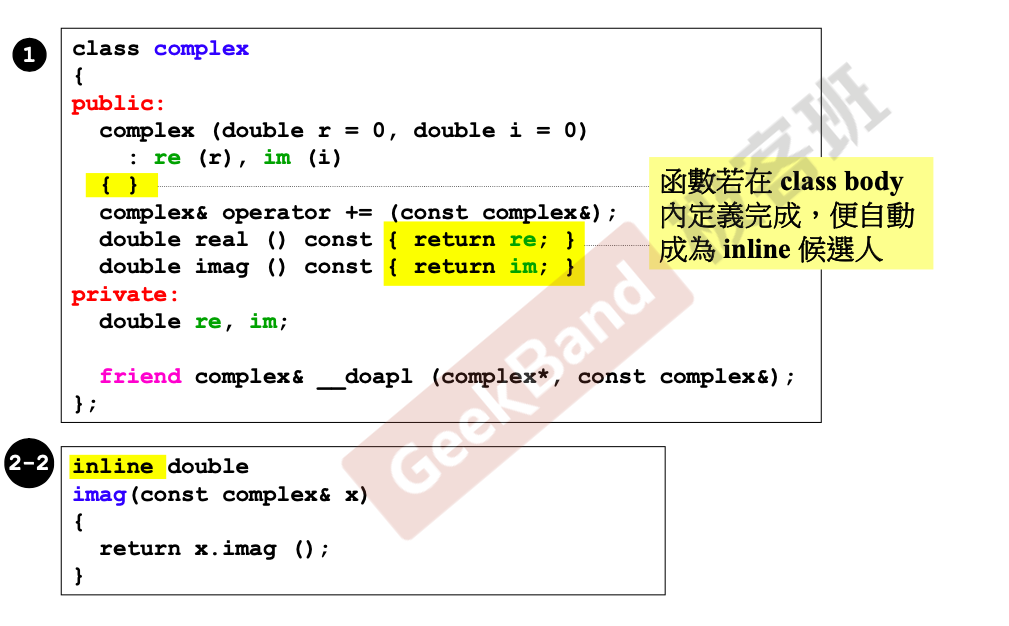
如果你的函数属于 inline 会比较快,而 inline 只是给编译器的建议而已,是不是真正的 inline 还是由编译器决定。

1
2
3
4
inline double
imag(const complex& x) {
return x.imag();
}

补充:内联函数在编译时会把函数的代码副本放置在每个调用该函数的地方,因此对内联函数进行任何修改都需要重新修改,否则将会继续使用旧的函数。

access level (訪問級別)
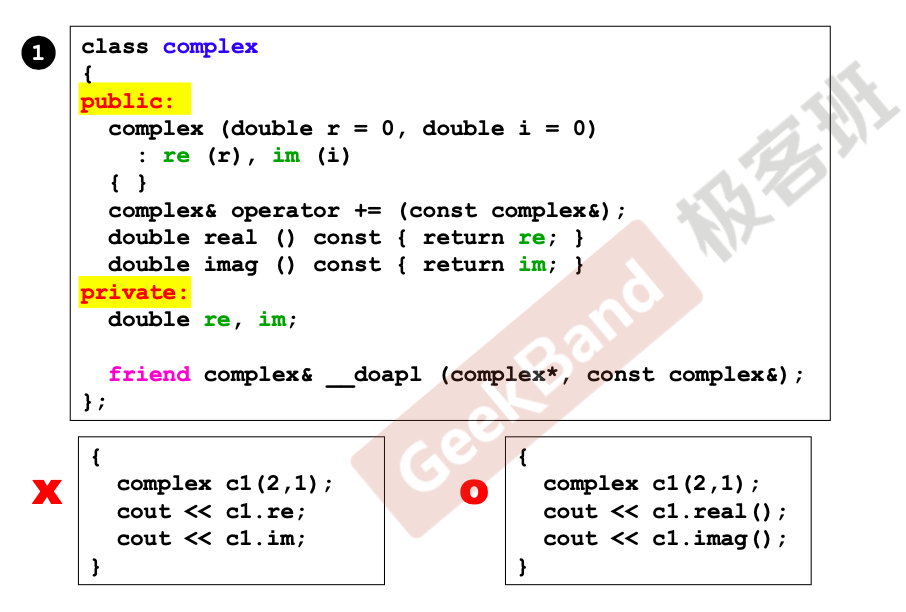
数据需要封装起来,函数部分则区分为处理内部事务和提供给外部调用两种情况。

下面代码是创建对象,需要调用构造函数。我都想打印它的实部和虚部出来:

1
2
3
4
5
6
complex c1(2, 1);
-cout << c1.re;
-cout << c1.im;

+cout << c1.real();
+cout << c1.imag();

constructor (ctor, 構造函數)

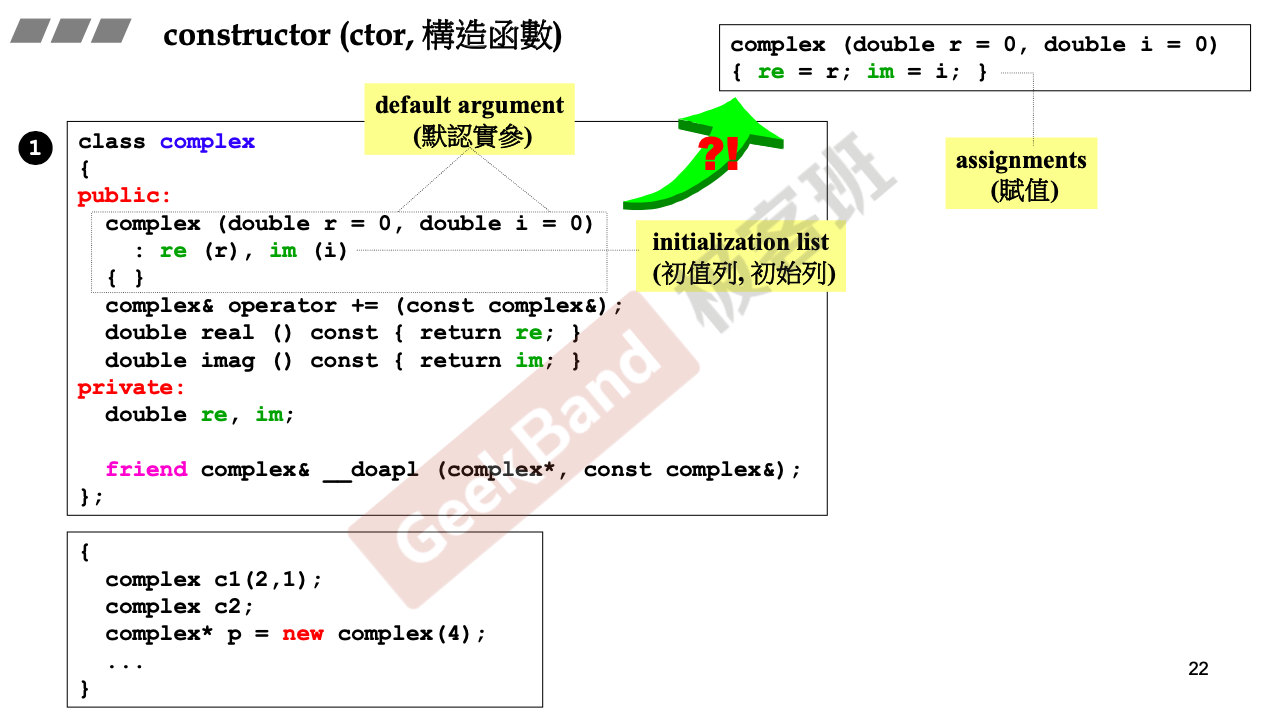
你想要创建一个对象构造函数会自动被调用,默认参数、初始化列表都是老生常谈的事情。

ctor (構造函數) 可以有很多個 – overloading (重載)
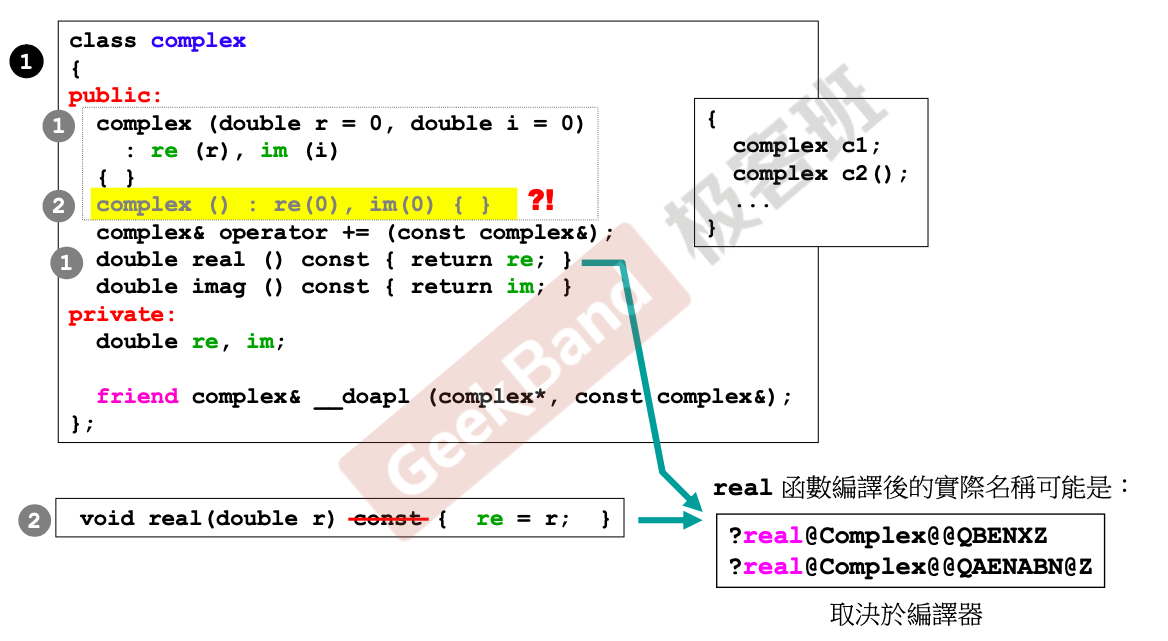
创建对象你可以有很多想法,所以构造函数可以有很多个,又被称为重载。在大部分例子中都可能看到一个以上的构造函数。

1
2
3
4
5
6
7
8
9
10
11
12
13
14
template<typename T>
class complex {
public:
- complex() : re(0), im(0) {}
complex(T r = 0, T i = 0)
: re(r), im(i) {}
complex& operator += (const complex&);
T real() const { return re; }
T imag() const { return im; }

private:
T re, im;
friend complex& _doap1(complex* ths, const complex& r);
};

同名函数可以有一个以上,既然同样名称那么将来调用的时候调用哪一个呢?其实函数实际名称编译器还是会区分开,编码为一个奇怪的东西,取决于编译器。

参数传递与返回值

constructor (ctor, 構造函數) 被放在 private 區
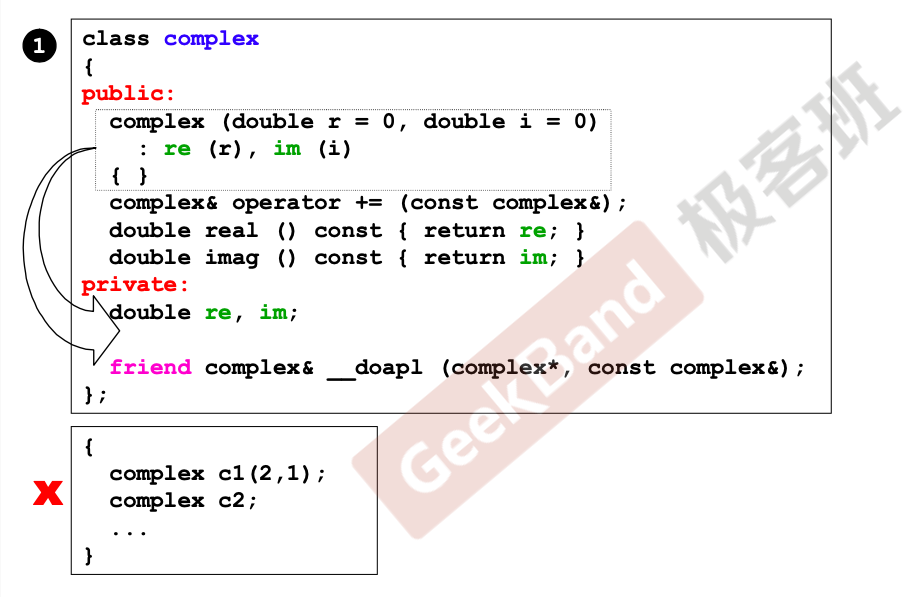
如果构造函数放在私有区域,那么外界将无法调用构造函数,这个动作是不合理的。

ctors 放在 private 區
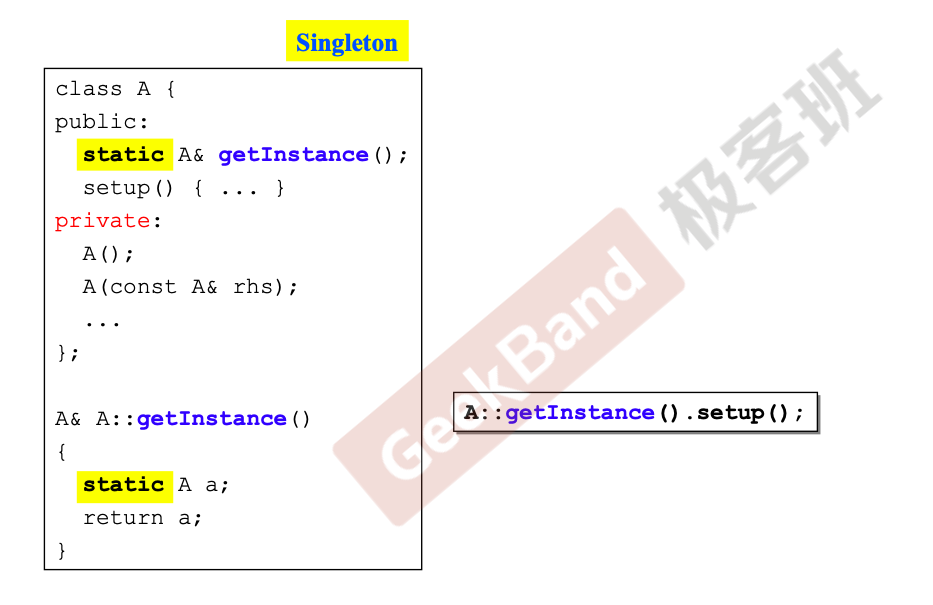
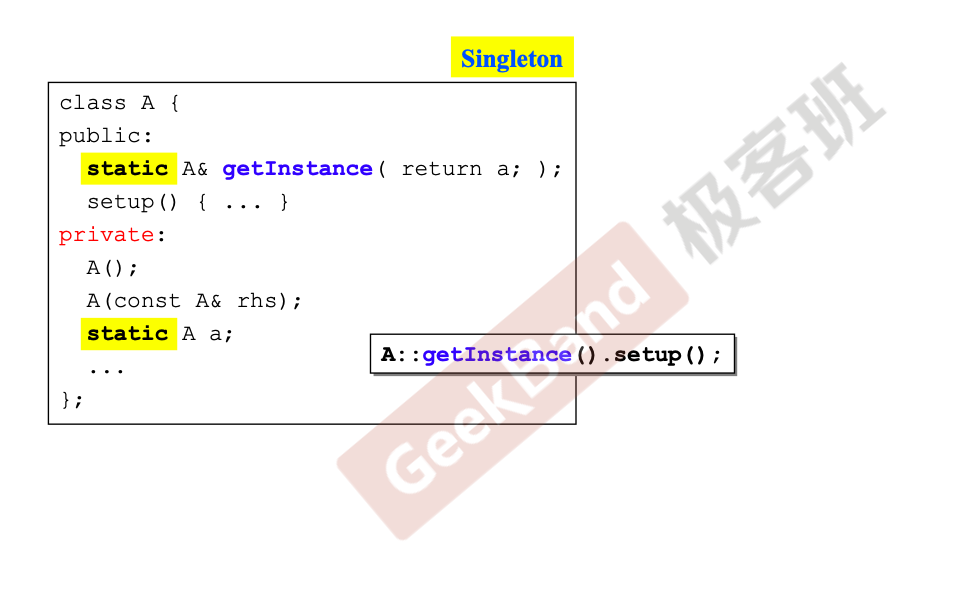
最简单的设计模式就是单例模式,它的写法就是刚刚我们说的把构造函数放在 private 里。 static 保证了这里的单一性,外界要这个类需通过 getInstance() 函数取得。

const member functions (常量成員函數)
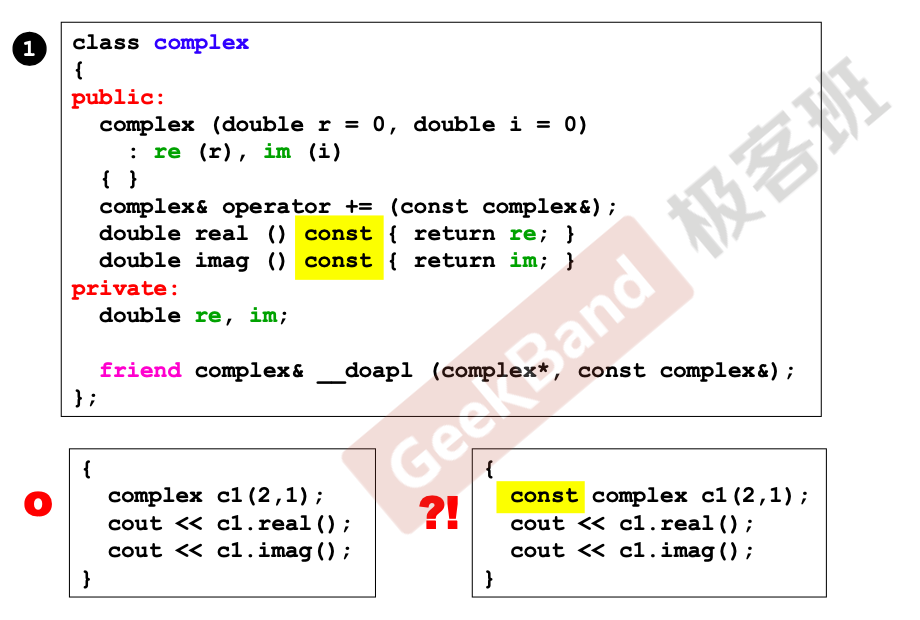
函数部分的 const 意味着不会改变数据内容,当你在想它的逻辑意义的时候就已经知道要不要加 const

參數傳遞:pass by value vs. pass by reference (to const)
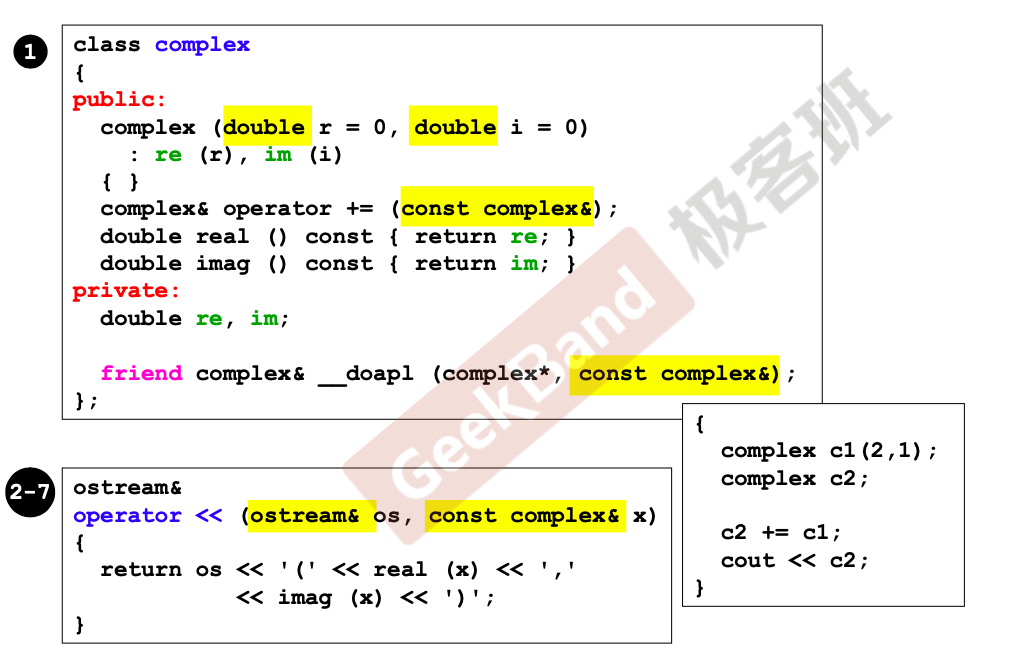
参数传递中值传递是整包传过来,如果这个参数很大在 C 语言中可以使用指针,这里的传引用就相当于传指针,但形式上更为优美(其实是语法糖),建议最好所有的参数传递使用引用。

返回值傳遞:return by value vs. return by reference (to const)
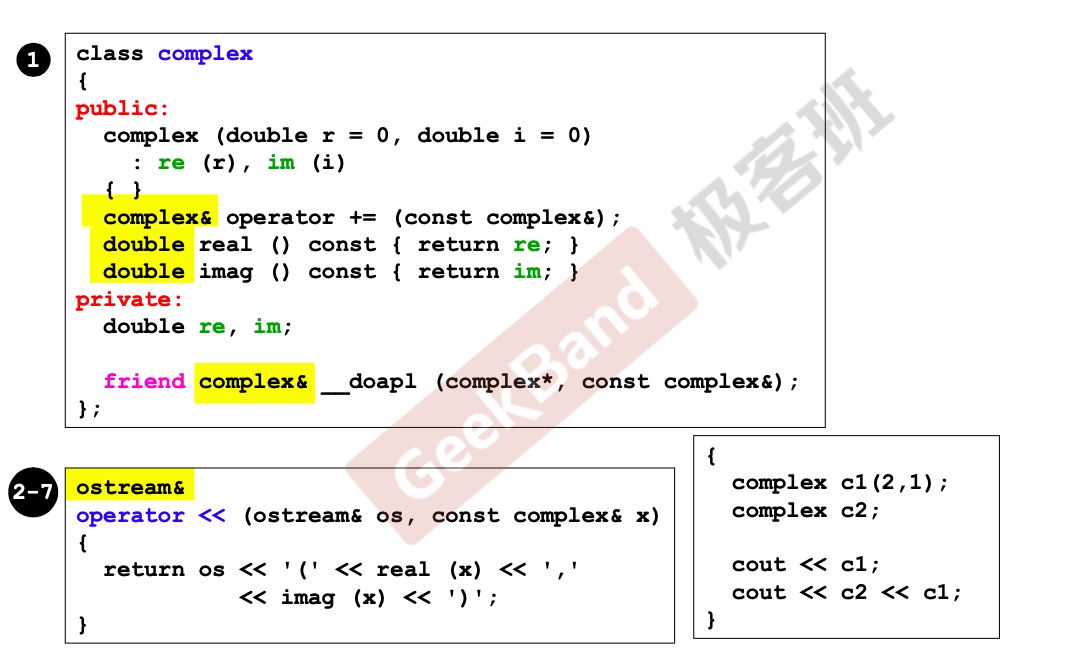
引用主要就是用来做参数传递和返回值,选择 C++ 主要就是为了效率,结论是返回值也尽量使用引用。

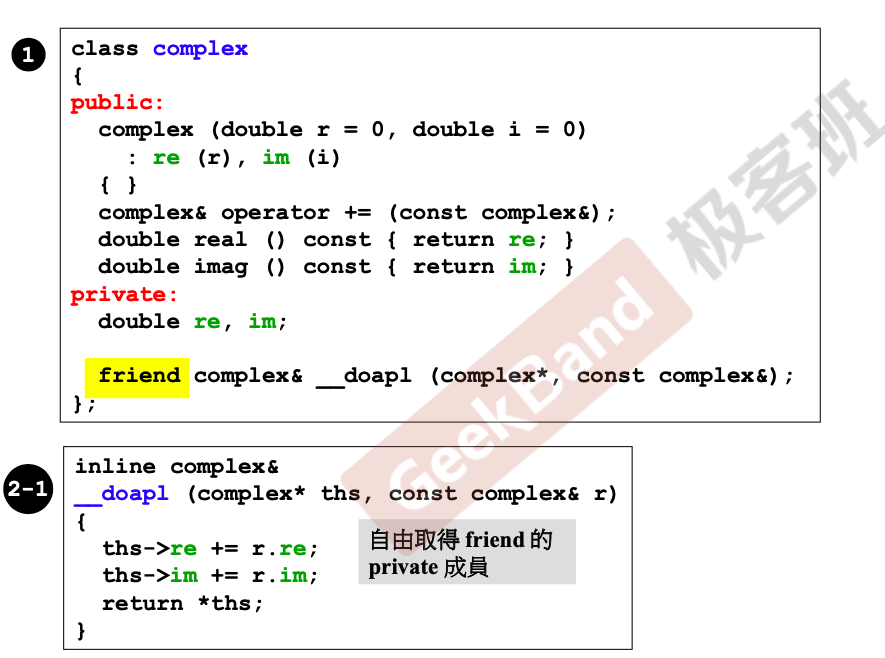
friend (友元)
1
2
3
4
5
inline complex& _doapl(complex* ths, const complex& r) {
ths->re += r.re;
ths->im += r.im;
return *ths;
}

友元就相当于现实生活中的朋友,可以来拿类里封装的数据。虽然我把实部虚部放在 private 就是不想让别人随意拿取,但对于一些函数它是我的朋友,我可以网开一面。

需要注意的是 C++ 强调封装性,而友元无疑是打破这种特性,需要谨慎使用。

相同 class 的各個 objects 互為 friends (友元)
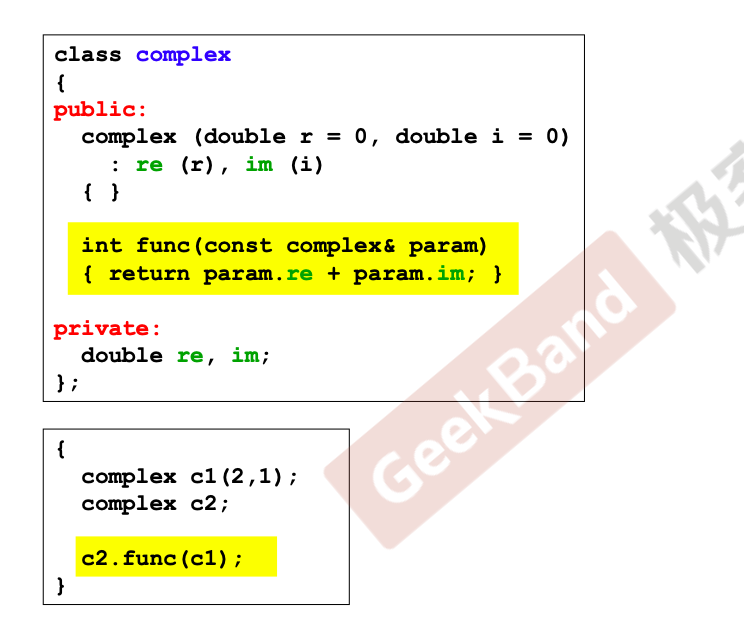
func() 接收另一个复数,它直接取得了传进来复数的实部和虚部。相同 class 的各個 objects 互為 friends (友元)。

class body 外的各種定義 (definitions)
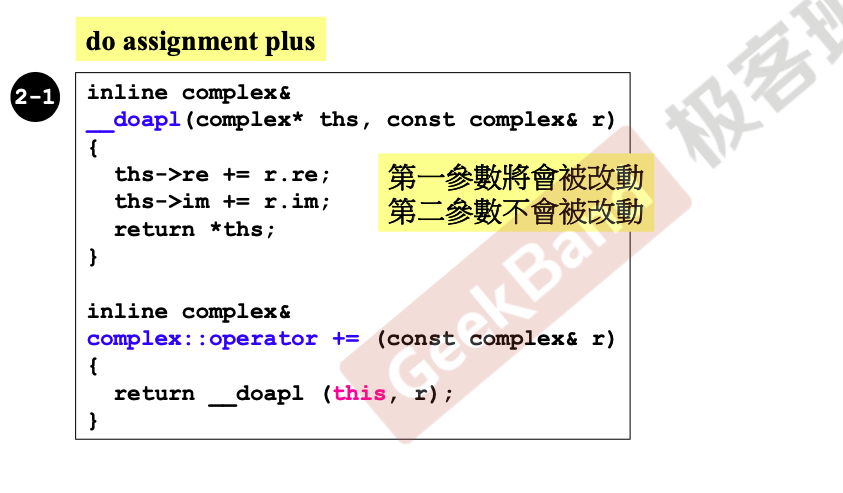
  • 什麼情況下可以 pass by reference
  • 什麼情況下可以 return by reference
1
2
3
4
5
6
7
8
9
inline complex& _doapl(complex* ths, const complex& r) {
ths->re += r.re;
ths->im += r.im;
return *ths;
}

inline complex& complex::operator+=(const complex& r) {
return _doapl(this, r);
}

操作符重载与临时对象

operator overloading (操作符重載-1, 成員函數) this
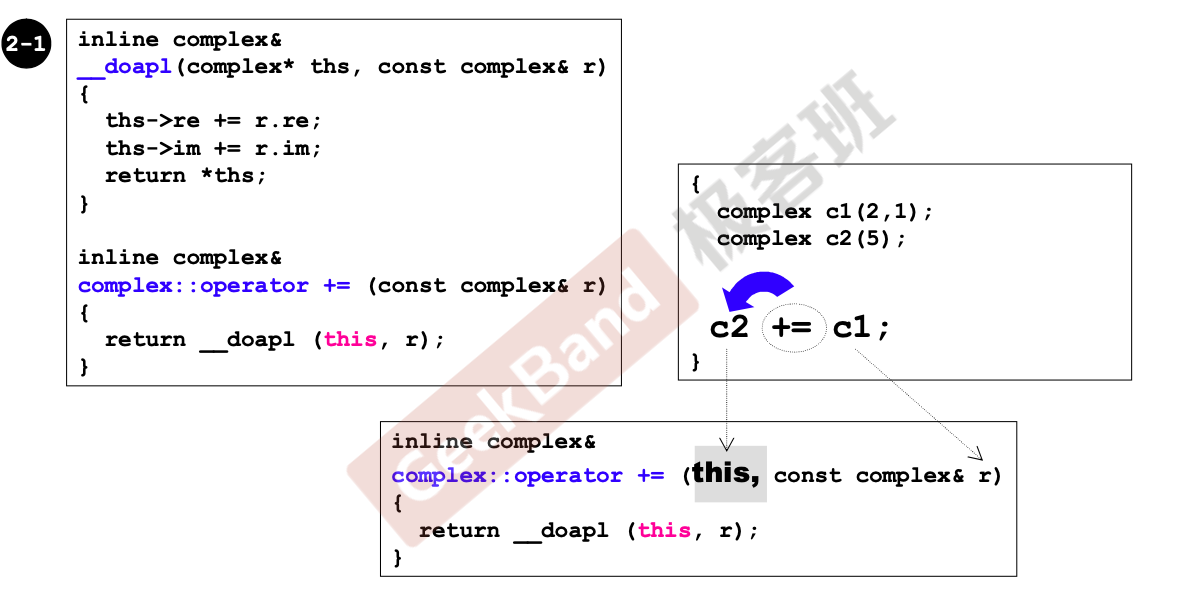
操作符重载是 C++ 很重要的特性。在其他语言里你要对一个东西做操作一般会涉及函数,事实上在 C++ 里面操作符就是一种函数,并且可以自己定义。

return by reference 語法分析
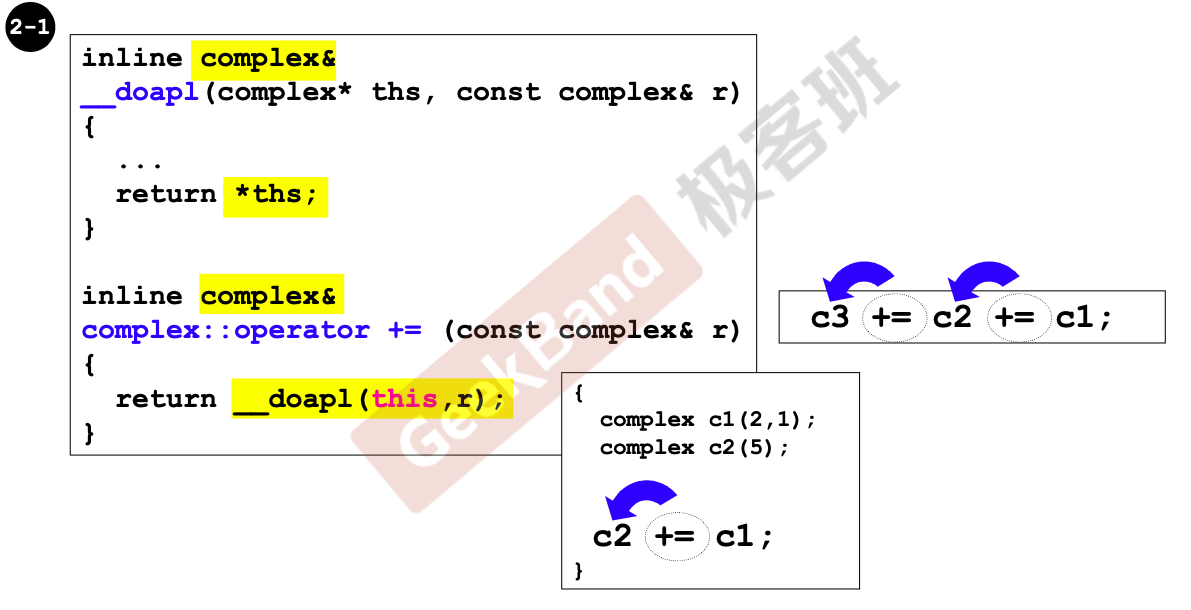
傳遞者無需知道接收者是以 reference 形式接收。

1
2
3
4
5
inline complex& _doapl(complex* ths, const complex& r) {
ths->re += r.re;
ths->im += r.im;
return *ths;
}

这里函数头是引用 complex&,返回的是指针内容 *ths。这种写法是正确的,虽然你返回的是内容,但接收端如何接收你不必在意,这也是引用的优点。

class body 之外的各種定義 (definitions)
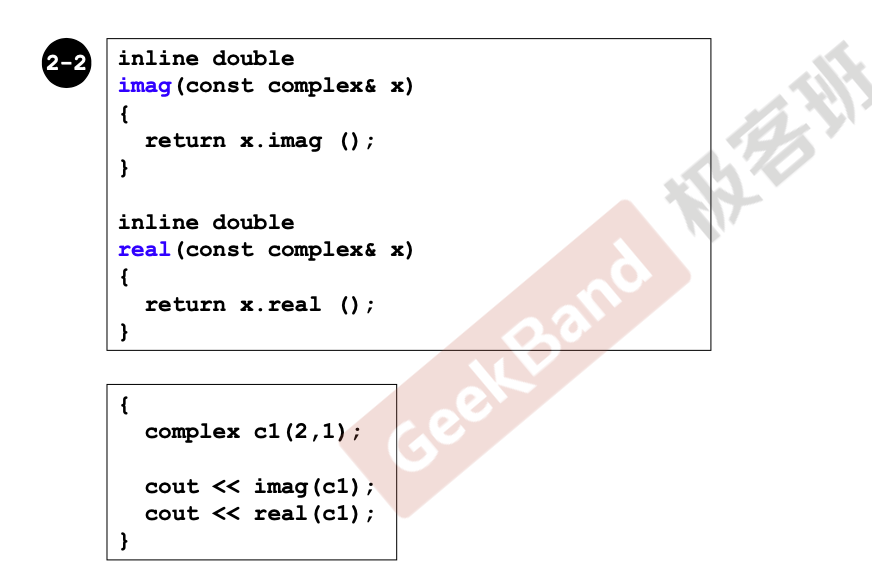
这两个函数没有带命名空间,所以是全局函数:

1
2
3
4
5
6
7
inline double imag(const complex& x) {
return x.imag();
}

inline double real(const complex& x) {
return x.real();
}

operator overloading (操作符重載-2, 非成員函數) (無 this)
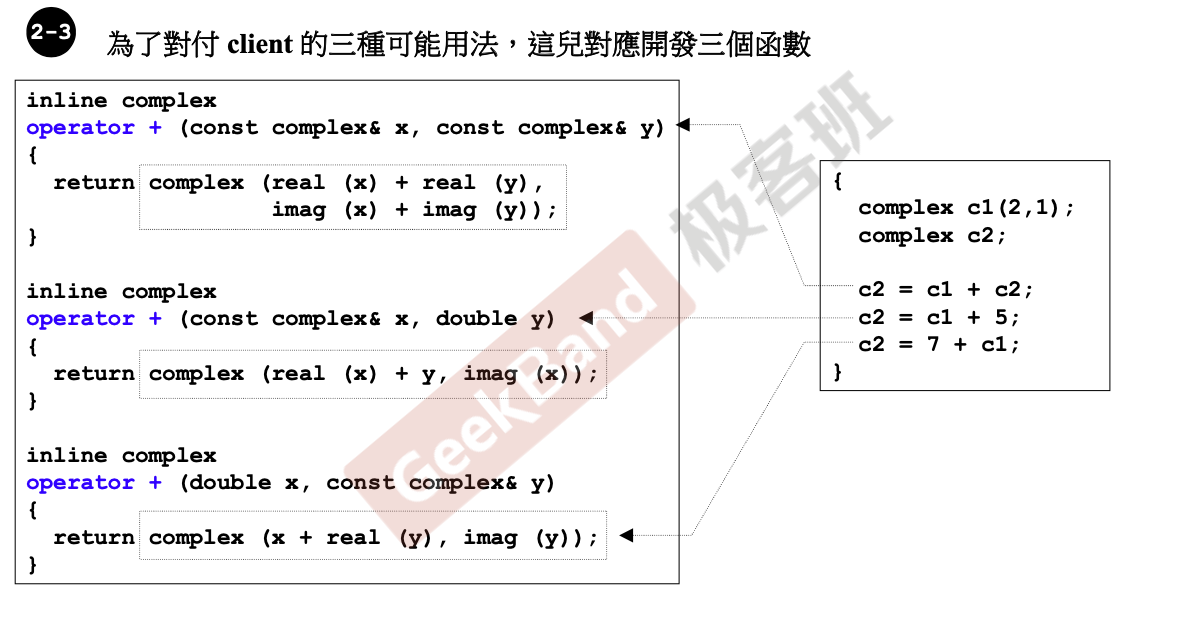
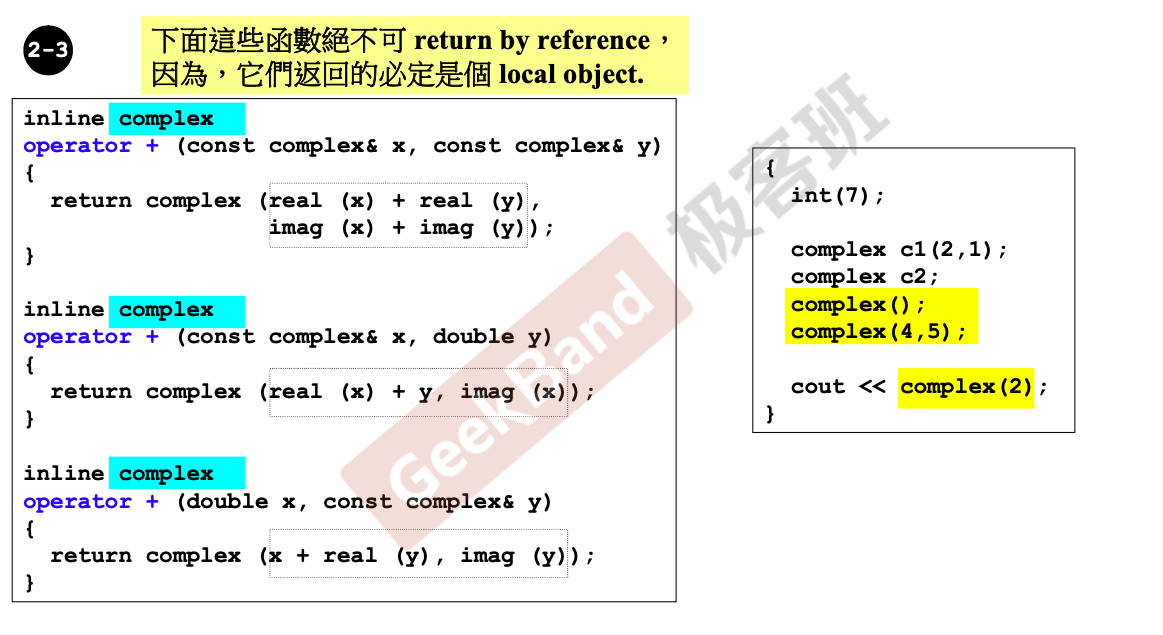
為了對付 client 的三種可能用法,這兒對應開發三個函數:

1
2
3
4
5
6
7
8
9
10
11
12
inline complex operator+ (const complex& x, const complex& y) {
return complex(real(x) + real(y),
imag(x) + imag(y));
}

inline complex operator+ (const complex& x, double y) {
return complex(real(x) + y, imag(x));
}

inline complex operator+ (double x, const complex& y) {
return complex(x + real(y), imag(y));
}

temp object(临时对象)typename();

为什么这些函数不返回引用呢?因為,它們返回的必定是個 local object.

class body 之外的各種定義 (definitions)
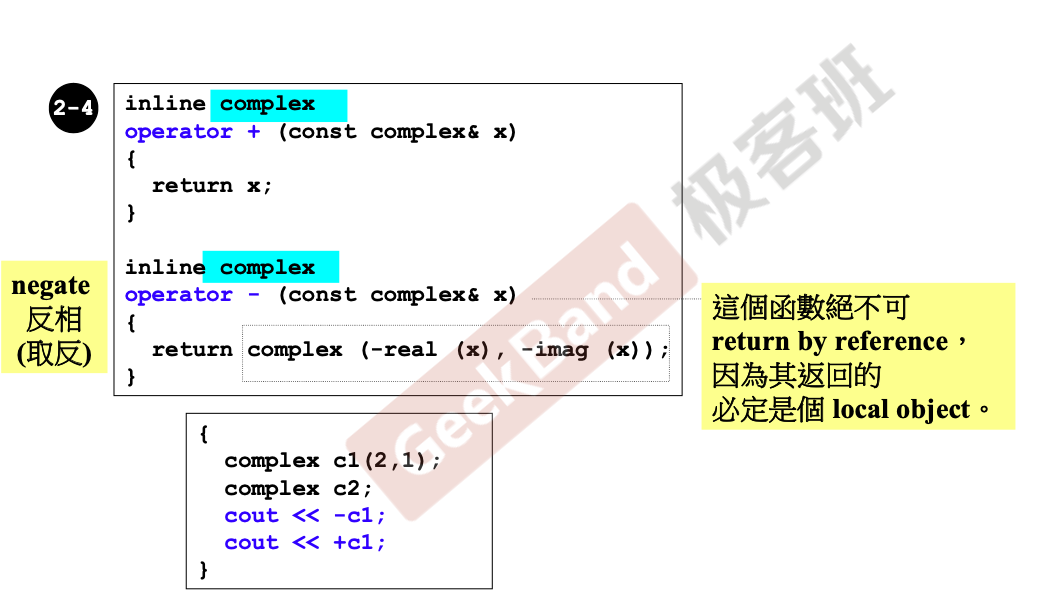
這個函數絕不可 return by reference, 因為其返回的必定是個 local object

1
2
3
4
5
6
7
inline complex operator+ (const complex& x) {
return x;
}

inline complex operator- (const complex& x) {
return complex(-real(x), -imag(x));
}

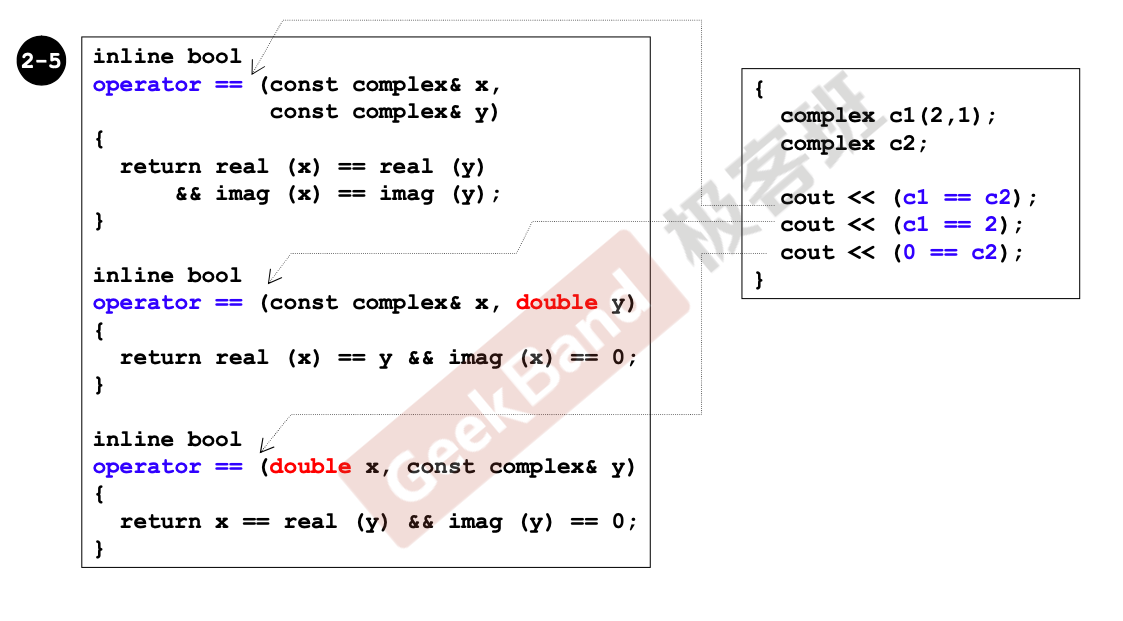
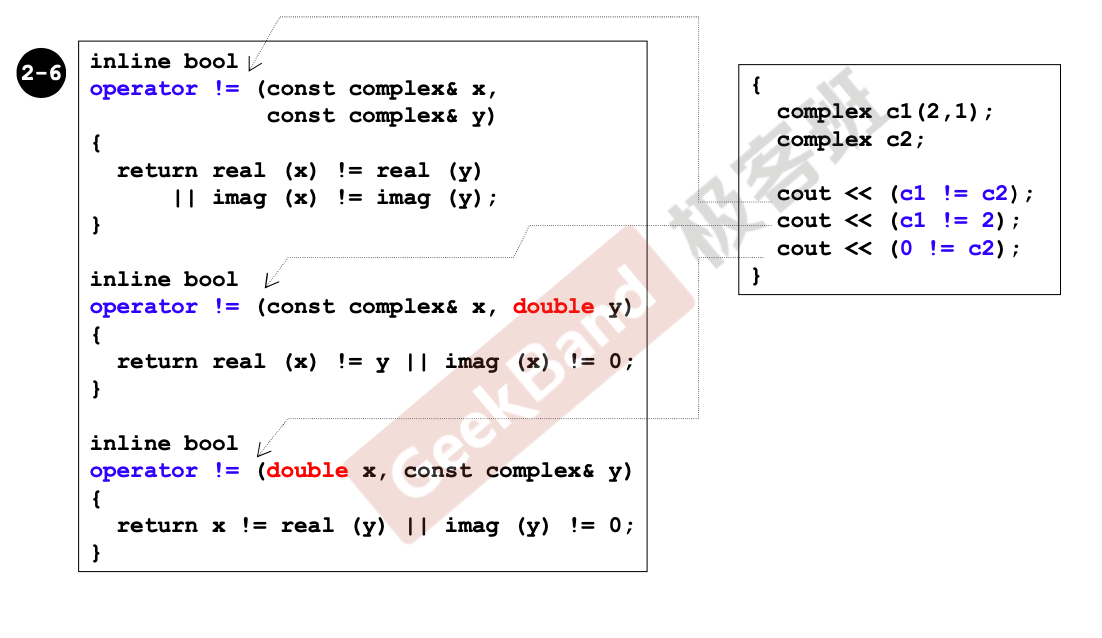
operator overloading (操作符重載), 非成員函數

1
2
3
4
5
6
7
8
9
10
11
12
inline bool operator== (const complex& x, const complex& y) {
return real(x) == real(y)
&& imag(x) == imag(y);
}

inline bool operator== (const complex& x, double y) {
return real(x) == y && imag(x) == 0;
}

inline bool operator== (double x, const complex& y) {
return x == real(y) && imag(y) == 0;
}

1
2
3
4
5
6
7
8
9
10
11
12
inline bool operator!= (const complex& x, const complex& y) {
return real(x) != real(y)
|| imag(x) != imag(y);
}

inline bool operator!= (const complex& x, double y) {
return real(x) != y || imag(x) != 0;
}

inline bool operator!= (double x, const complex& y) {
return x != real(y) || imag(y) != 0;
}

1
2
3
4
5
6
7
8
9
10
inline complex conj(const complex& x) {
return complex(real(x), -imag(x));
}


#include <iostream>
ostream& operator<< (ostream& os, const complex& x) {
return os << '(' << real(x) << ','
<< imag(x) << ')';
}

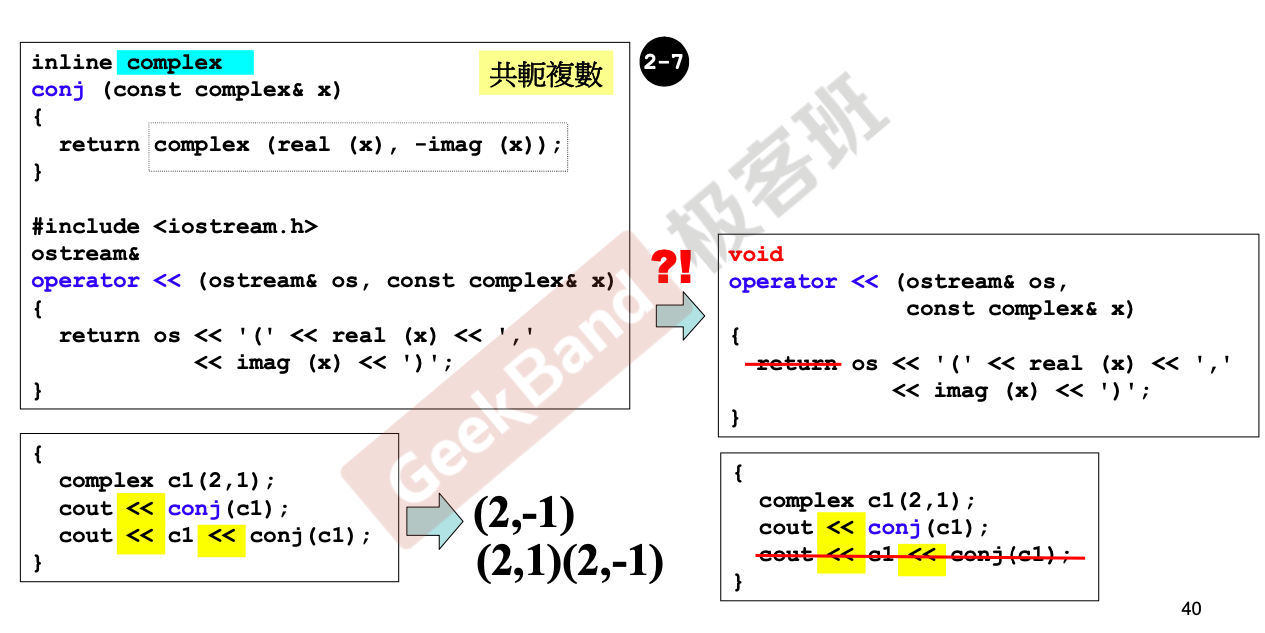
对于 << 操作符你只能选择全局的写法。

这里需要声明 std:: 以区别之前的 ostream,如果按照之前的写法会出错:

1
2
3
4
5
6
7
8
9
10
11
12
13
14
15
16
17
18
19
20
21
22
23
24
25
#ifndef _COMPLEX_
#define _COMPLEX_

#include <cmath>

class complex;
-class ostream;

complex& _doapl(complex* ths, const complex& r);

class complex {
......
}


......


#include <iostream>
+std::ostream& operator<< (std::ostream& os, const complex& x) {
return os << '(' << real(x) << ','
<< imag(x) << 'i' << ')';
}

#endif //_COMPLEX_

Complex 类实现过程

测试用例

1
2
3
4
5
6
7
8
9
10
11
12
13
14
15
16
17
18
19
20
21
#include "complex.h"
using namespace std;

int main() {
complex c1(2, 1);
complex c2;
cout << c1 << endl;
cout << c2 << endl;

c2 = c1 + 5;
c2 = 7 + c1;
c2 = c1 + c2;
c2 += c1;
c2 += 3;
c2 = -c1;
cout << (c1 == c2) << endl;
cout << (c1 != c2) << endl;
cout << conj(c1) << endl;

return 0;
}

具体实现

1
2
3
4
5
6
7
8
9
10
11
12
13
14
15
16
17
18
19
20
21
22
23
24
25
26
27
28
29
30
31
32
33
34
35
36
37
38
39
40
41
42
43
44
45
46
47
48
49
50
51
52
53
54
55
56
57
58
59
60
61
62
63
64
65
66
67
68
69
70
71
72
73
74
75
76
77
78
79
80
81
82
83
84
85
86
87
88
89
90
91
92
93
94
95
96
97
98
99
100
101
#ifndef _COMPLEX_
#define _COMPLEX_

#include <cmath>

class complex;

complex& _doapl(complex* ths, const complex& r);

class complex {
public:
complex(double r = 0, double i = 0)
: re(r), im(i) {}
complex& operator += (const complex&);
double real() const { return re; }
double imag() const { return im; }

private:
double re, im;
friend complex& _doapl(complex* ths, const complex& r);
};

inline complex& complex::operator+=(const complex& r) {
return _doapl(this, r);
}


inline double imag(const complex& x) {
return x.imag();
}

inline double real(const complex& x) {
return x.real();
}

inline complex& _doapl(complex* ths, const complex& r) {
ths->re += r.re;
ths->im += r.im;
return *ths;
}

inline complex operator+ (const complex& x, const complex& y) {
return complex(real(x) + real(y),
imag(x) + imag(y));
}

inline complex operator+ (const complex& x, double y) {
return complex(real(x) + y, imag(x));
}

inline complex operator+ (double x, const complex& y) {
return complex(x + real(y), imag(y));
}

inline complex operator+ (const complex& x) {
return x;
}

inline complex operator- (const complex& x) {
return complex(-real(x), -imag(x));
}

inline bool operator== (const complex& x, const complex& y) {
return real(x) == real(y)
&& imag(x) == imag(y);
}

inline bool operator== (const complex& x, double y) {
return real(x) == y && imag(x) == 0;
}

inline bool operator== (double x, const complex& y) {
return x == real(y) && imag(y) == 0;
}

inline bool operator!= (const complex& x, const complex& y) {
return real(x) != real(y)
|| imag(x) != imag(y);
}

inline bool operator!= (const complex& x, double y) {
return real(x) != y || imag(x) != 0;
}

inline bool operator!= (double x, const complex& y) {
return x != real(y) || imag(y) != 0;
}

inline complex conj(const complex& x) {
return complex(real(x), -imag(x));
}


#include <iostream>
std::ostream& operator<< (std::ostream& os, const complex& x) {
return os << '(' << real(x) << ','
<< imag(x) << 'i' << ')';
}

#endif //_COMPLEX_

拷贝构造,拷贝赋值与析构函数

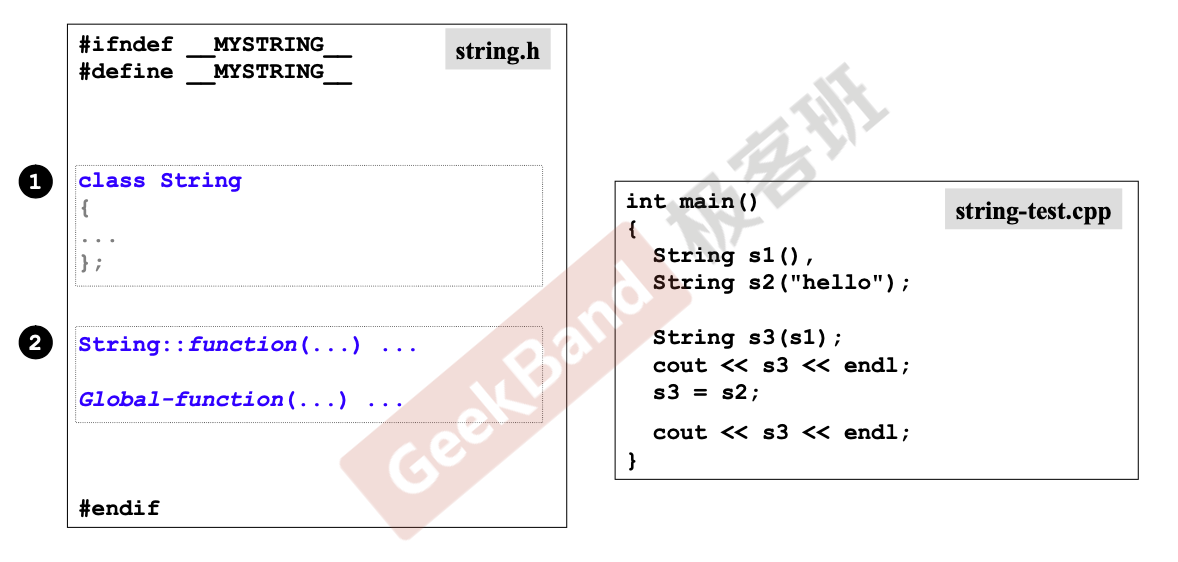
String class

1
2
3
4
5
6
7
8
9
int main() {
String s1();
String s2("hello");

String s3(s1);
cout << s3 << endl;
s3 = s2;
cout << s3 << endl;
}

需要注意的是这里有两个拷贝动作:

1
2
String s3(s1);
s3 = s2;

分别是拷贝构造和拷贝赋值。

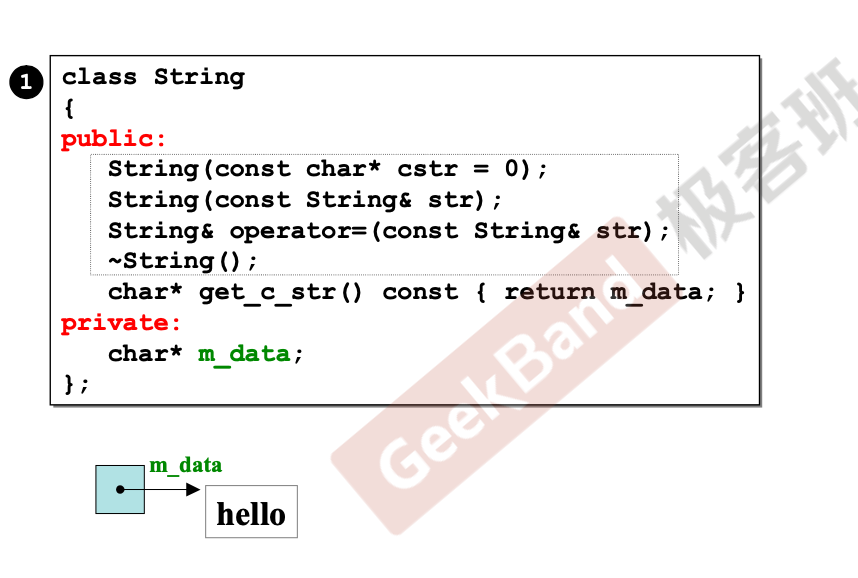
Big Three, 三個特殊函數

1
2
3
4
5
6
7
8
9
10
11
class String {
public:
String(const char* cstr = 0);
String(const String& str);
String& operator=(const String& str);
~String();
char* get_c_str() const { return m_data; }

private:
char* m_data;
};

一般而言字符串都会这样设计,让字符串里有一个指针 m_data,在需要内存的时候才去创建另外一个空间创建字符。这是因为字符串的东西有大有小,有时候是空字符串,所以这样的动态设计比较好,而不要在字符串里面放一个数组。

ctor 和 dtor (構造函數 和 析構函數)
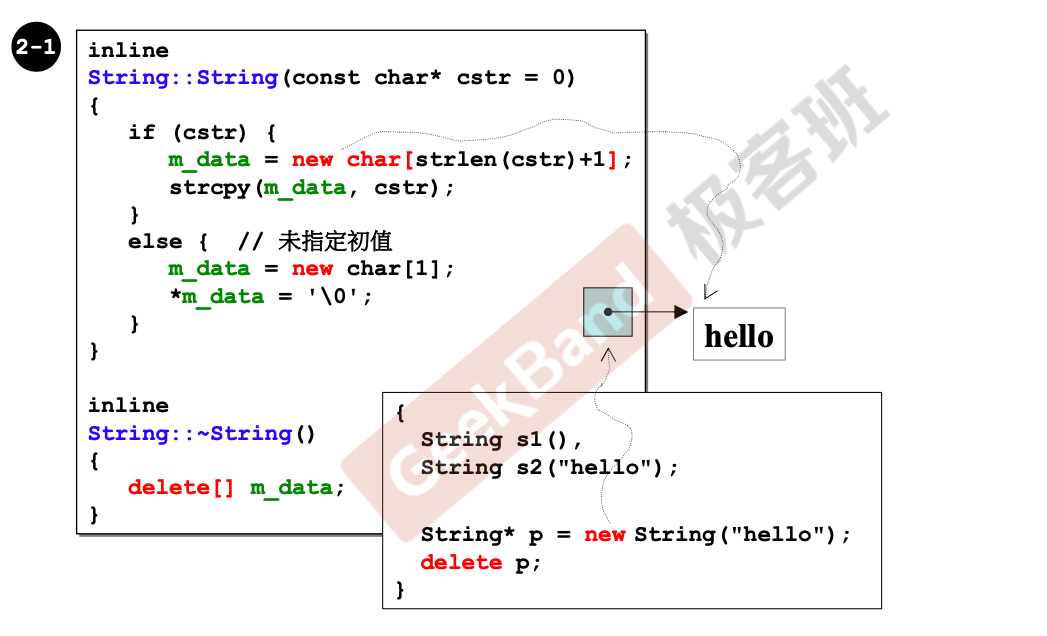
字符串长度有两种设计思路,一种是不知道多长,但最后面有一个标识符 \0;另外一种是后面没有标识符,但前面多一个长度的整数。如果你的对象带有指针,那么大概率需要这样动态分配,那么在析构函数需要将你动态分配的内存释放掉。

1
2
3
4
5
6
7
8
9
10
11
12
13
inline String::String(const char* cstr) {
if (cstr) {
m_data = new char[strlen(cstr) + 1];
strcpy(m_data, cstr);
} else {
m_data = new char[1];
*m_data = '\0';
}
}

inline String::~String() {
delete[] m_data;
}

class with pointer members 必須有 copy ctor 和 copy op=
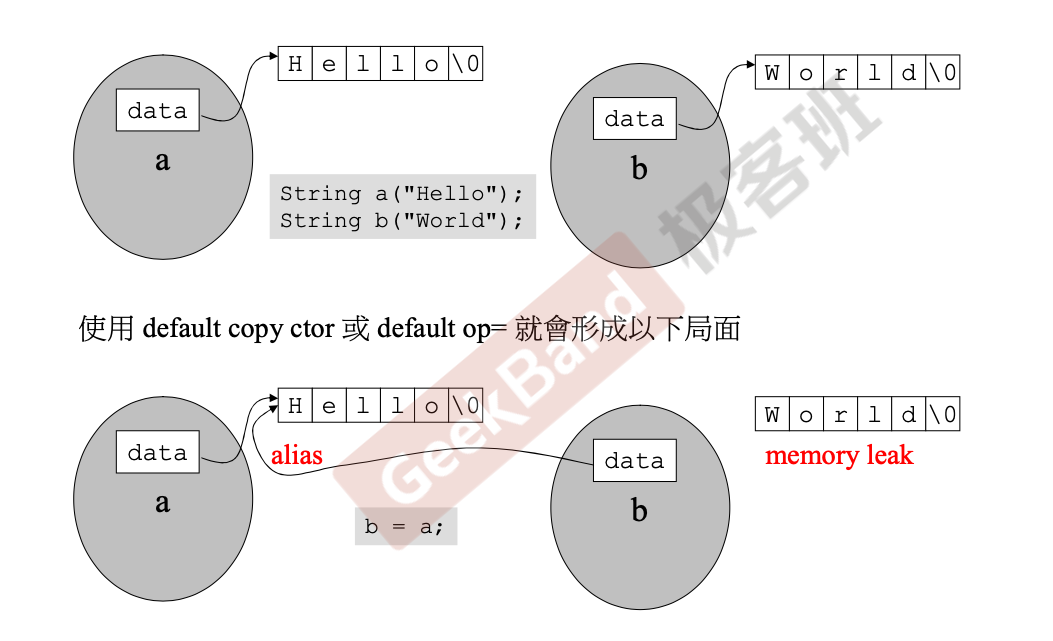
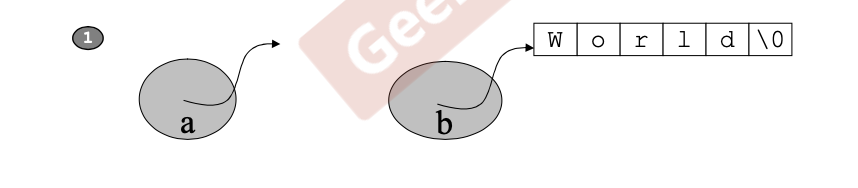
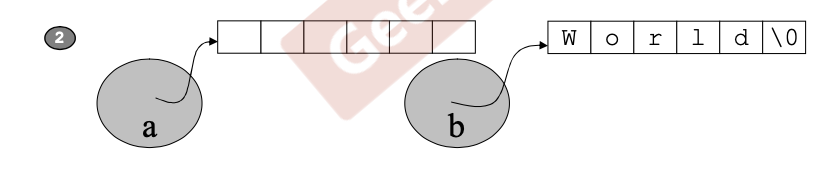
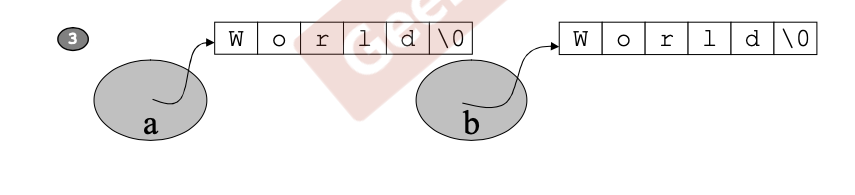
如果成员变量有指针,那么必须包含拷贝构造和拷贝赋值。如果没有自己写,编译器默认做法会造成内存泄漏,上图所示虽然 ba 的内容相同,但原有的 World\0 找不到变成孤儿了,并且两个指针指向同一个区域这个操作本身同样非常危险。

copy ctor (拷貝構造函數)
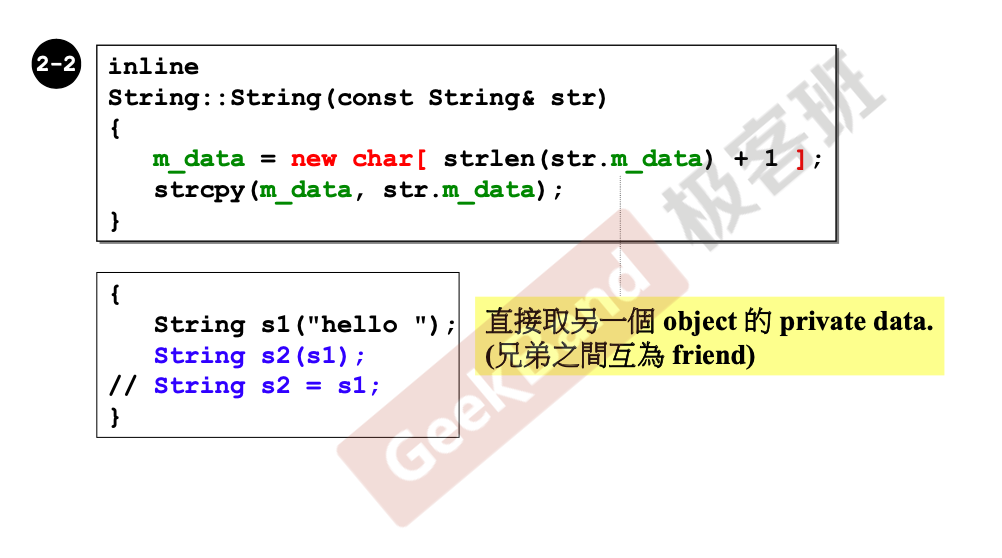
我们来看看什么叫深拷贝。上面是一个构造函数,拷贝则是因为参数是它本身,好比石头拷贝给石头,人拷贝给人,猪拷贝给猪,所以这个叫拷贝构造函数。拷贝构造应该创造出足够的空间来放置数据。

1
2
3
4
inline String::String(const String &str) {
m_data = new char[strlen(str.m_data) + 1];
strcpy(m_data, str.m_data);
}

如果没有写这个函数,编译器给的默认版本只会拷贝指针,也称之为浅拷贝,这是我们要避免的。

copy assignment operator (拷貝賦值函數)
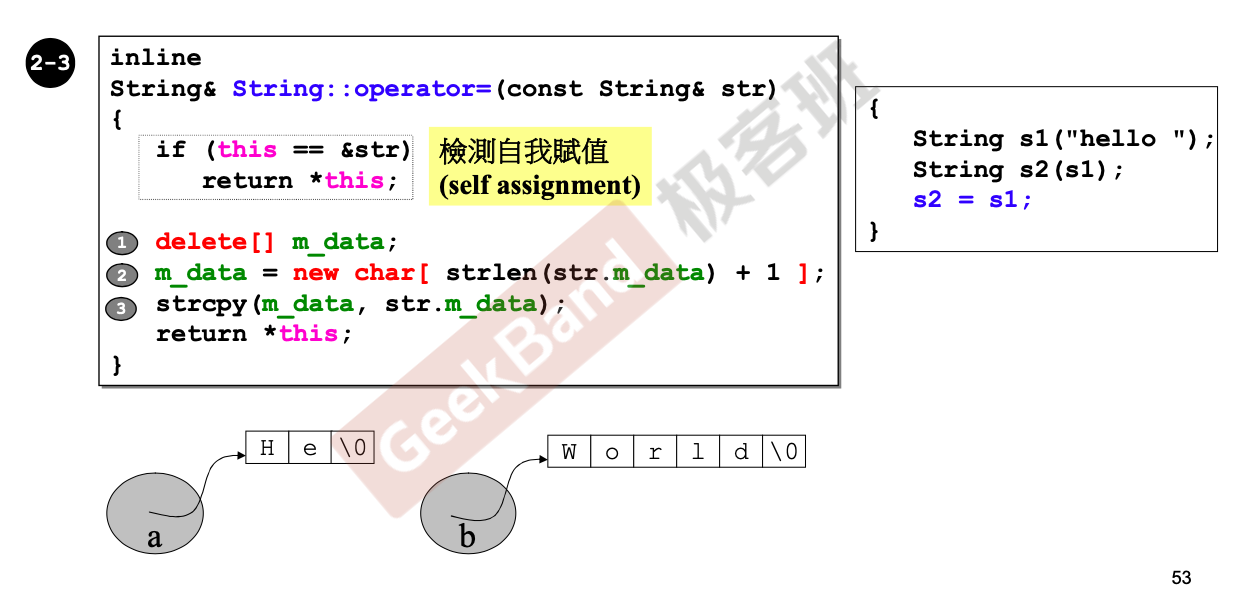
拷贝赋值这个概念要把右手的东西赋值或拷贝给左手,假设左右本来都有东西:

  1. 先把左边清空
  2. 创建出跟右边一样大的空间
  3. 再把右边赋值到左边
1
2
3
4
5
6
7
8
9
inline String& String::operator=(const String& str) {
if (this == &str)
return *this;

delete[] m_data;
m_data = new char[strlen(str.m_data) + 1];
strcpy(m_data, str.m_data);
return *this;
}

一定要在 operator= 中檢查是否 self assignment
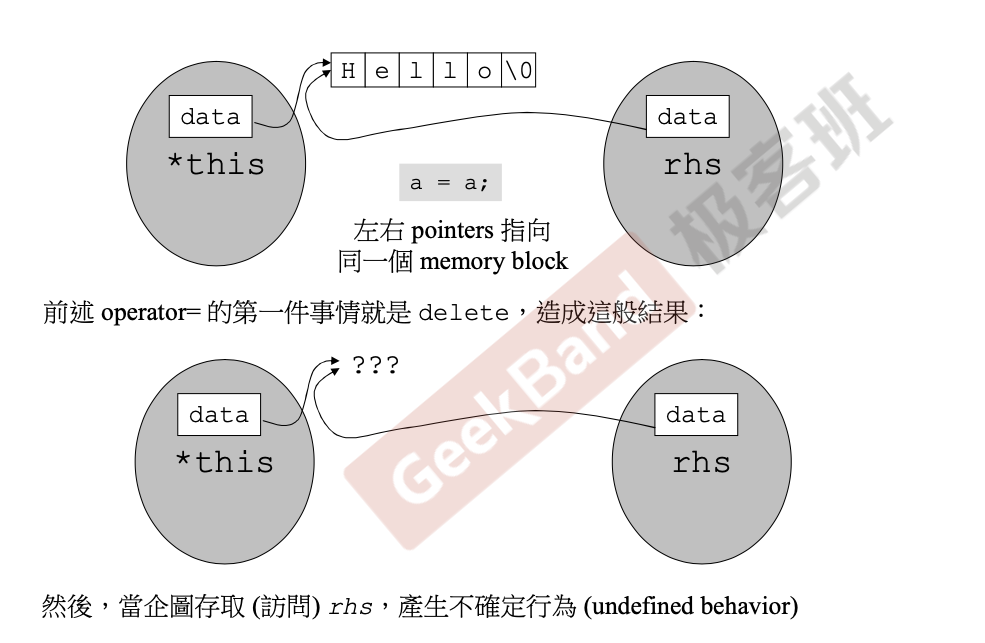
注意自己赋值给自己的情况,檢測自我賦值 (self assignment)。

堆栈与内存管理

output 函數
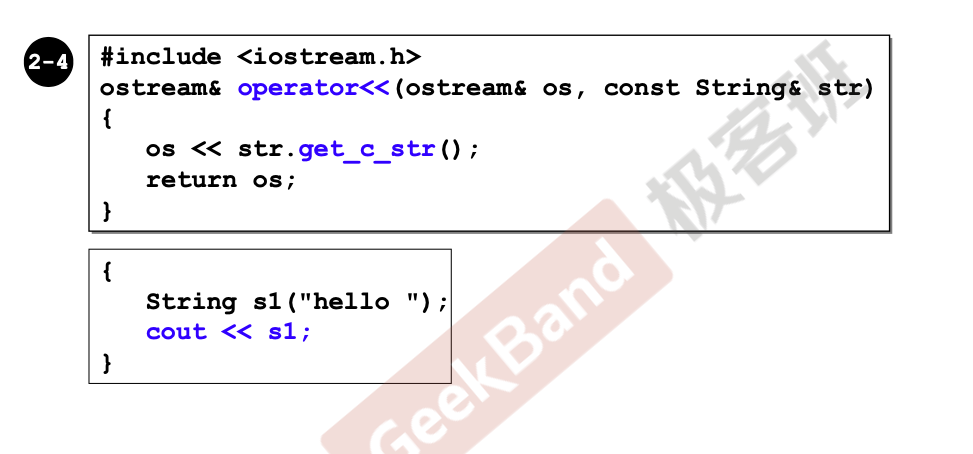
1
2
3
4
5
#include <iostream>
std::ostream& operator<< (std::ostream& os, const String& str) {
os << str.get_c_str();
return os;
}

所謂 stack (棧), 所謂 heap (堆)

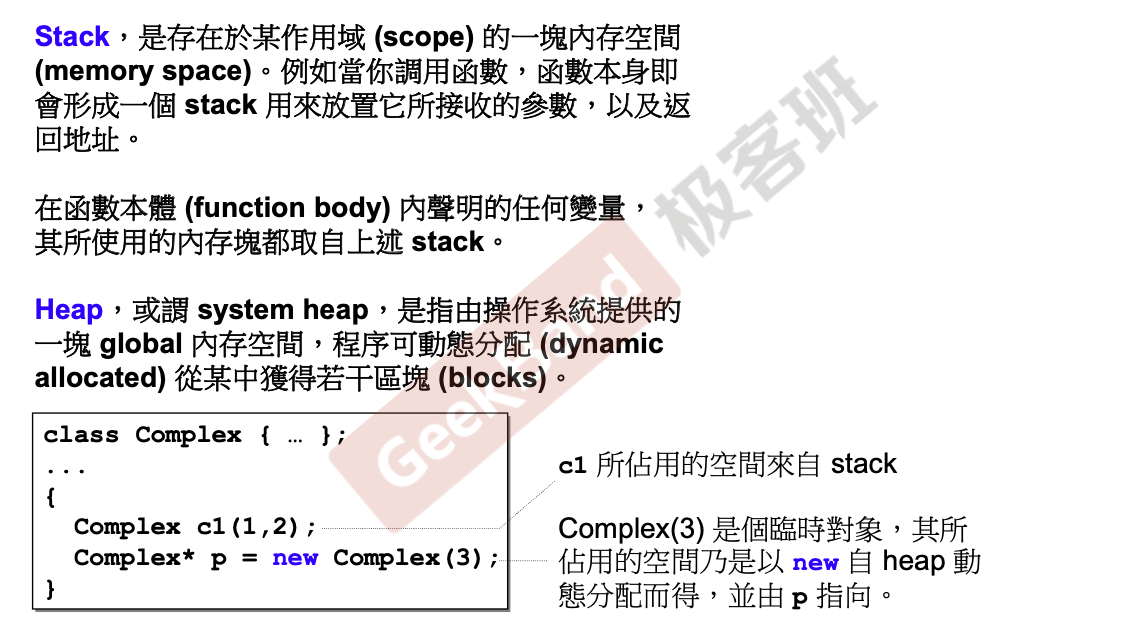
Stack,是存在於某作用域 (scope) 的一塊內存空間 **(memory space)**。例如當你調用函數,函數本身即會形成一個 stack 用來放置它所接收的參數,以及返回地址。

在函數本體 (function body) 內聲明的任何變量, 其所使用的內存塊都取自上述 stack

Heap,或謂 system heap,是指由操作系統提供的 一塊 global 內存空間,程序可動態分配 (dynamic allocated) 從某中獲得若干區塊 **(blocks)**。

1
2
3
4
5
6
class Complex {...};
...
{
Complex c1(1, 2);
Complex* p = new Complex(3);
}

stack objects 的生命期

1
2
3
4
5
class Complex { ... };
...
{
Complex c1(1,2);
}

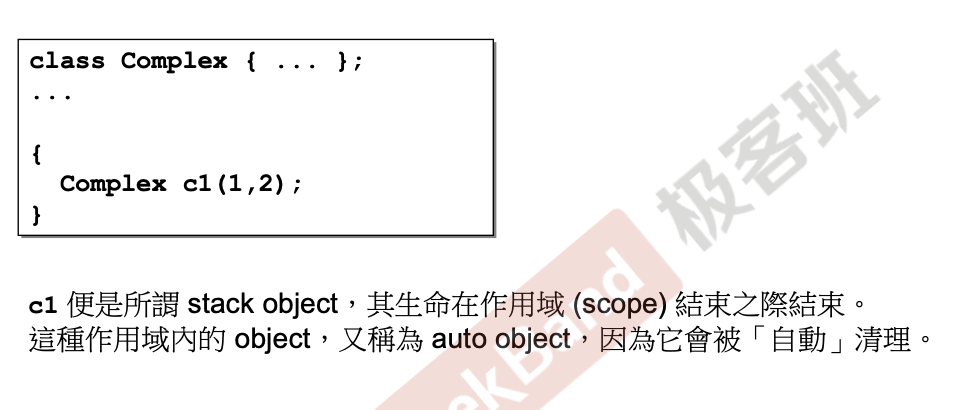
c1 便是所謂 stack object,其生命在作用域 (scope) 結束之際結束。 這種作用域內的 object,又稱為 auto object,因為它會被「自動」清理。

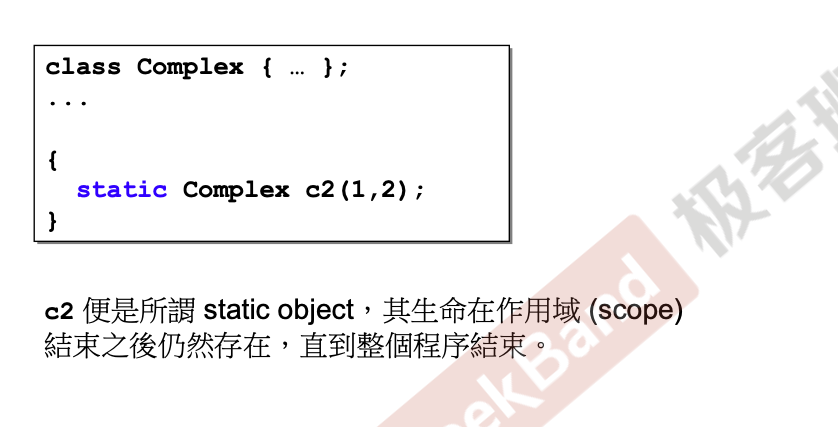
static local objects 的生命期
1
2
3
4
5
class Complex {...};
...
{
static Complex c2(1, 2);
}

c2 便是所謂 static object,其生命在作用域 (scope) 結束之後仍然存在,直到整個程序結束。

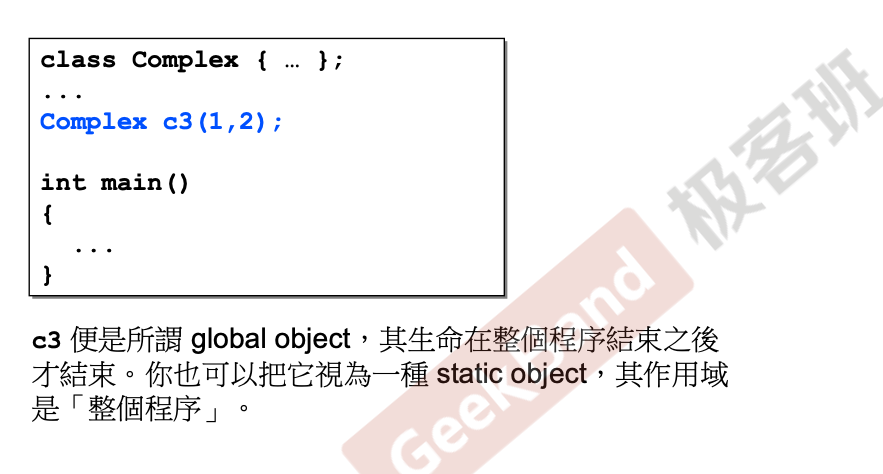
global objects 的生命期
1
2
3
4
5
6
7
8
class Complex {...};
...
Complex c3(1, 2);

int main()
{
...
}

c3 便是所謂 global object,其生命在整個程序結束之後才結束。你也可以把它視為一種 static object,其作用域 是「整個程序」。

heap objects 的生命期
1
2
3
4
5
6
7
8
class Complex {...};
...

{
Complex* p = new Complex;
...
delete p;
}

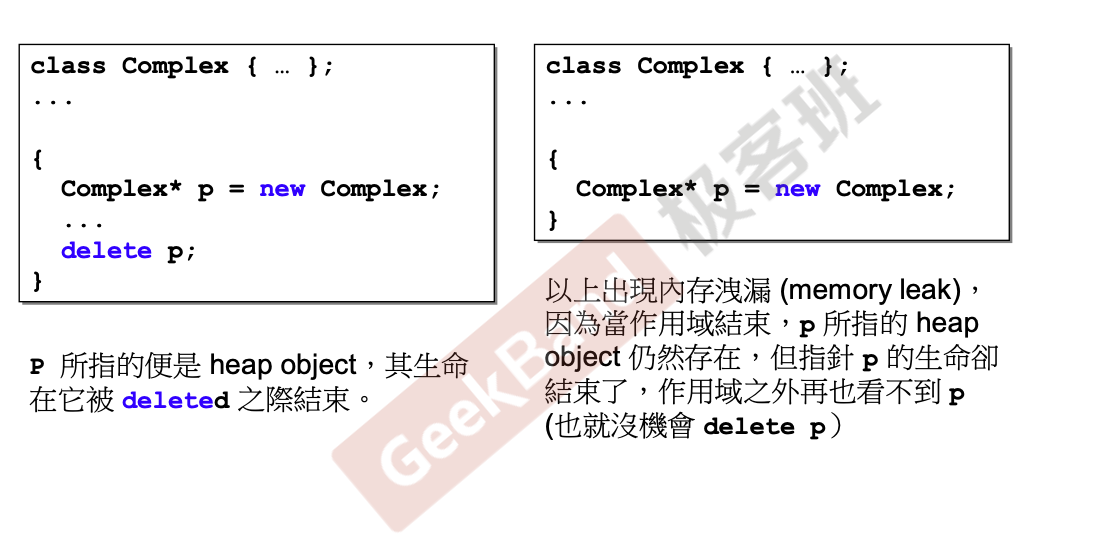
P 所指的便是 heap object,其生命 在它被 deleted 之際結束。

1
2
3
4
5
6
class Complex {...};
...

{
Complex* p = new Complex;
}

以上出現內存洩漏 (memory leak), 因為當作用域結束,p 所指的 heap object 仍然存在,但指針 p 的生命卻結束了,作用域之外再也看不到 p (也就沒機會 delete p)

new:先分配 memory, 再調用 ctor
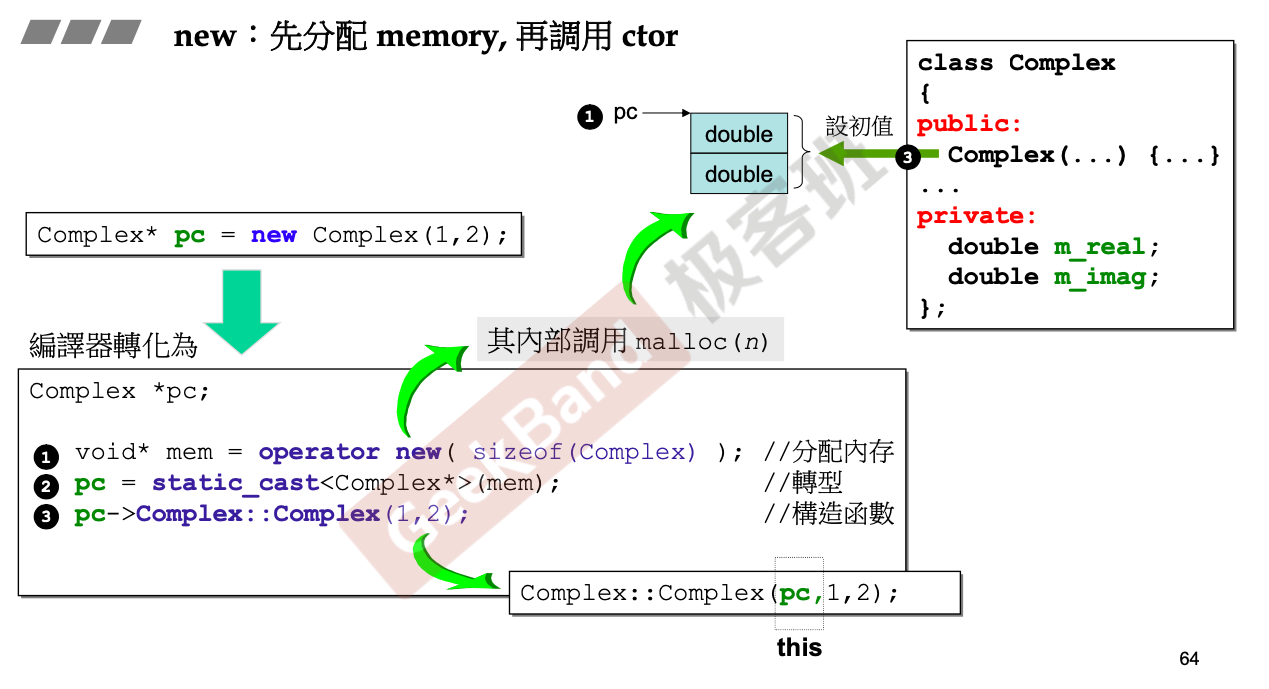
你的 C++ 语法书籍会查到 new 任何一个东西先得到一片空间,然后调用构造函数。我们把这样的事情结合起来,new 被分解为三个动作:

  1. operator new() 函数调用 malloc() 分配内存
  2. static_cast<> 把第一步得到的指针进行类型转换
  3. 通过这个指针调用构造函数 Complex()

delete:先調用 dtor, 再釋放 memory
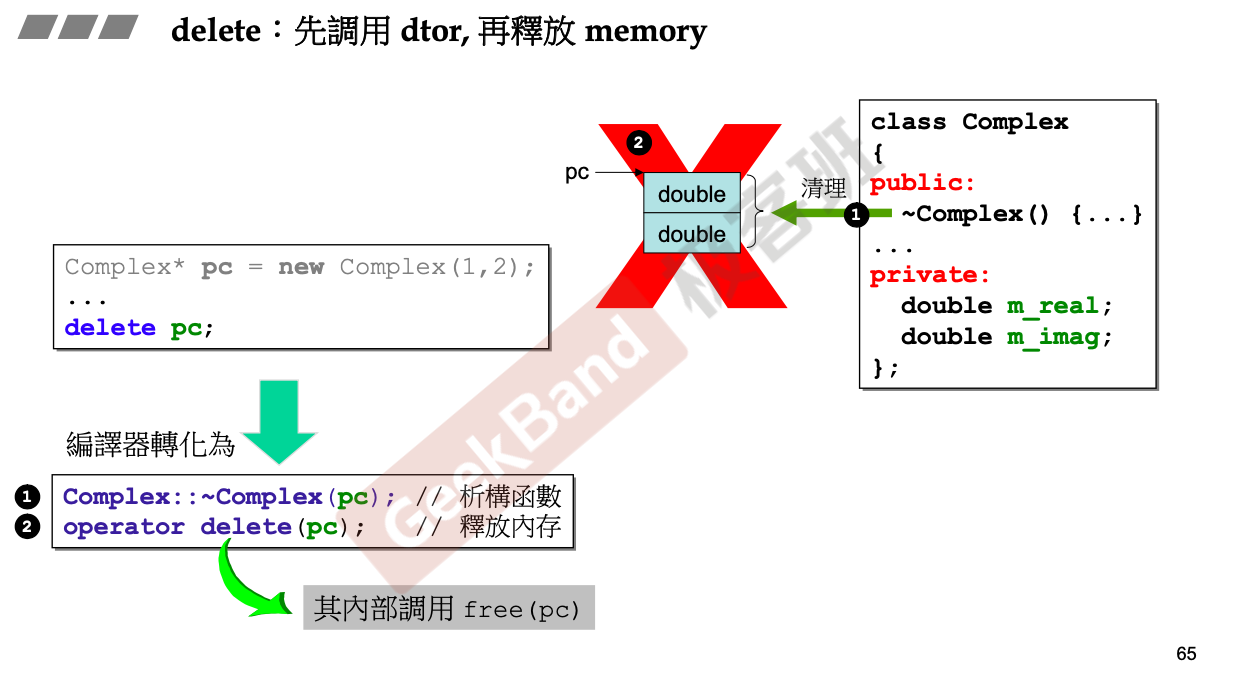
你的语法书还会告诉你,delete 先调用析构函数再释放内存。这个次序跟之前的 new 刚刚相反,这里 delete 被转化为两个动作:

  1. 首先调用析构函数 ~Complex()
  2. operator delete() 函数调用 free() 释放内存

動態分配所得的內存塊 (memory block), in VC

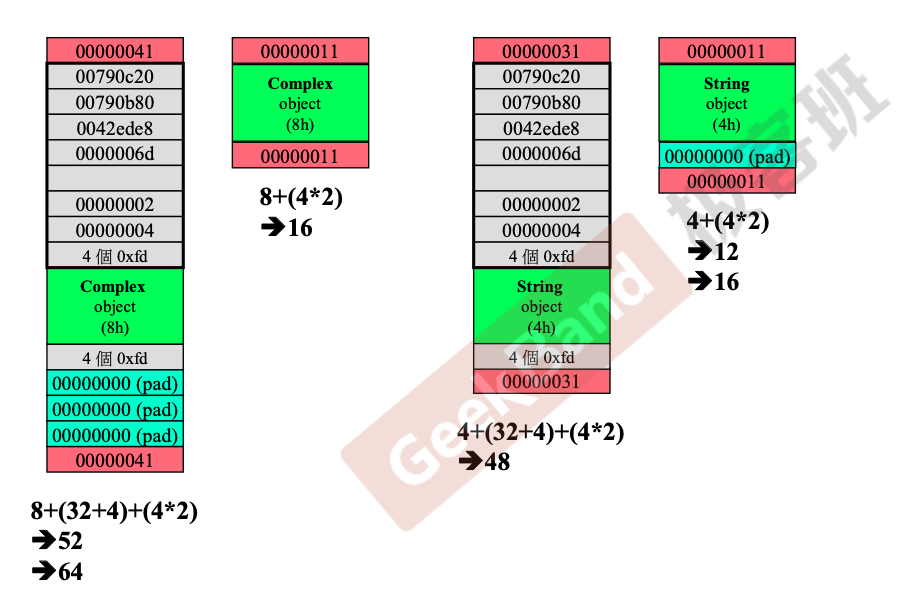
如果你分配一个复数,刚刚算过是 8 个字节(2 个 double),体现在图上就是最左边的亮绿色区块。那么你只得到 8 个字节码?在调试模式下,你会得到上面 4 * 8 = 32 个字节,下面还会多得到一个 4 字节,体现在图上就是最左边的灰色区块。除此之外,你还会得到上下两块红色区块 Cookie 4 * 2 = 8 个字节。由于是在 VC 环境下区块分配必须为 16 的倍数,而 52 不是,所以还要填补青绿色区域 pad 4 * 3 = 12:
$$
Compelex(4 \times 2) + Debug(4 \times 8 + 4) + Cookie(4 \times 2) + Pad(4 \times 3) = 64
$$
对于初学者一般使用 Release 模式,保留 Complex 和 Cookie 再次计算会得到 4 * 2 + 4 * 2 = 16,刚好满足 16 的倍数不需要添加 pad。

上下 Cookie 的作用在于帮助系统回收内存,如果你只给一个指针系统怎么知道该回收多少呢?所以必须记录这个长度。观察 Cookie 的 00000041,4 为 64/16 的倍数,而 1 则代表这块内存已经被分配出去,相当于一个标识符。

对于字符串只内含一个指针,指针大小为 4 字节,在调试模式下加上灰色区块 4 * 8 + 4 = 36 字节,上下 Cookie 为 4 * 2 = 8 个字节。最后得到 48 字节正好是 16 的倍数,所以不需要填补 pad 区域。同理在 Release 模式下 12 不满足 16 的倍数,所以需要填补 4 字节到达 16 进位。

当然你不知道这些事情不会对你的编程有立即的影响,但是知道它我们更能够彻底掌握。

動態分配所得的 array
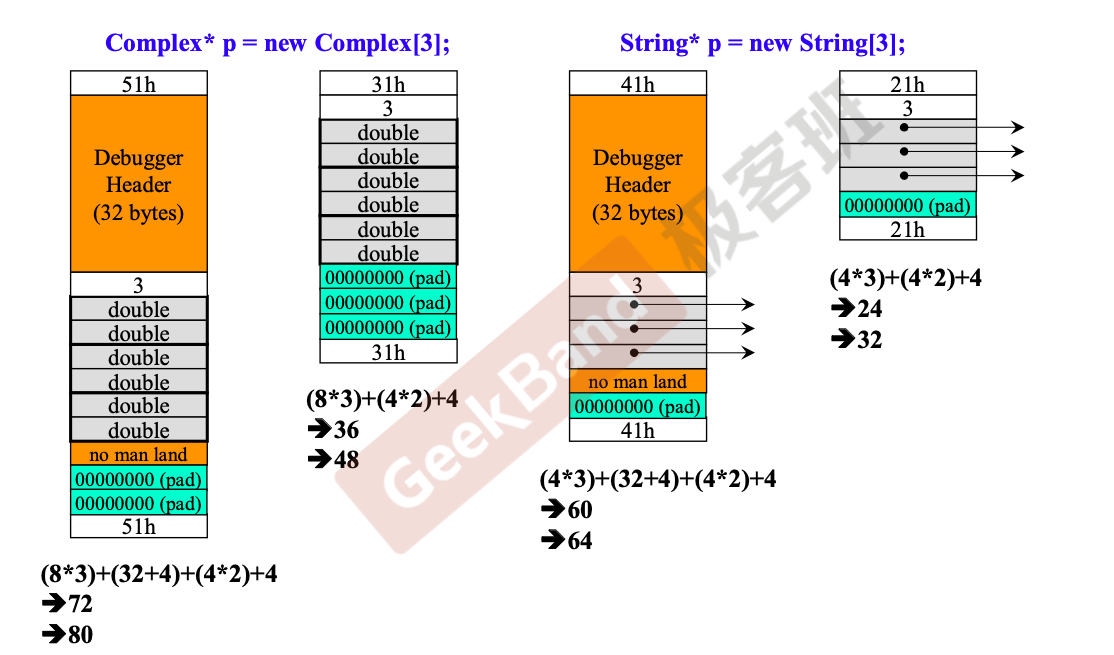
如果我们分配的是数组呢?假设我要分配三个复数,那么就是 6 个 double 4 * 6 = 24 字节,调试模式下增加上下 4 * 8 + 4 字节,加上上下 Cookie 4 * 2 = 8,最后 VC 的做法会分配一块空间记录数组的大小为 3。

同理可以推导字符串的内存分配。

array new 一定要搭配 array delete
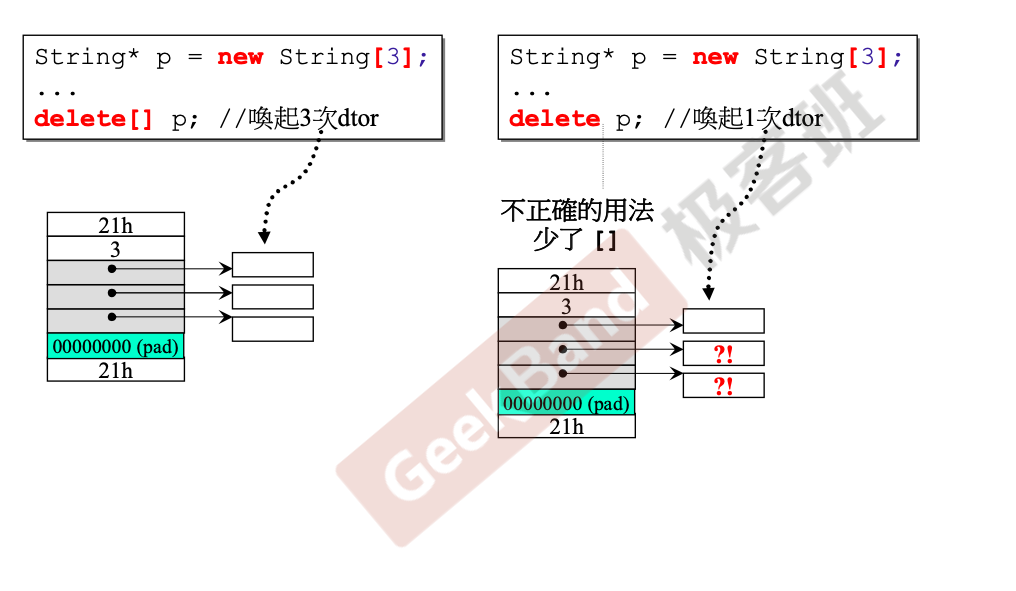
经过刚才的内存分配,我们可以看到 delete[] 的重要性,只有把 [] 写出来编译器才知道下面还有数组,而析构函数调用次数的差别会造成内存泄漏。

String 类实现过程

测试用例

1
2
3
4
5
6
7
8
9
int main() {
String s1;
String s2("hello");

String s3(s1);
cout << s3 << endl;
s3 = s2;
cout << s3 << endl;
}

具体实现

1
2
3
4
5
6
7
8
9
10
11
12
13
14
15
16
17
18
19
20
21
22
23
24
25
26
27
28
29
30
31
32
33
34
35
36
37
38
39
40
41
42
43
44
45
46
47
48
49
50
51
52
#ifndef _MYSTRING_
#define _MYSTRING_

class String {
public:
String(const char* cstr = 0);
String(const String& str);
String& operator=(const String& str);
~String();
char* get_c_str() const { return m_data; }

private:
char* m_data;
};

inline String::String(const char* cstr) {
if (cstr) {
m_data = new char[strlen(cstr) + 1];
strcpy(m_data, cstr);
} else {
m_data = new char[1];
*m_data = '\0';
}
}

inline String::~String() {
delete[] m_data;
}

inline String::String(const String& str) {
m_data = new char[strlen(str.m_data) + 1];
strcpy(m_data, str.m_data);
}

inline String& String::operator=(const String& str) {
if (this == &str)
return *this;

delete[] m_data;
m_data = new char[strlen(str.m_data) + 1];
strcpy(m_data, str.m_data);
return *this;
}


#include <iostream>
std::ostream& operator<< (std::ostream& os, const String& str) {
os << str.get_c_str();
return os;
}

#endif //_MYSTRING_

类模板与函数模板

進一步補充:static

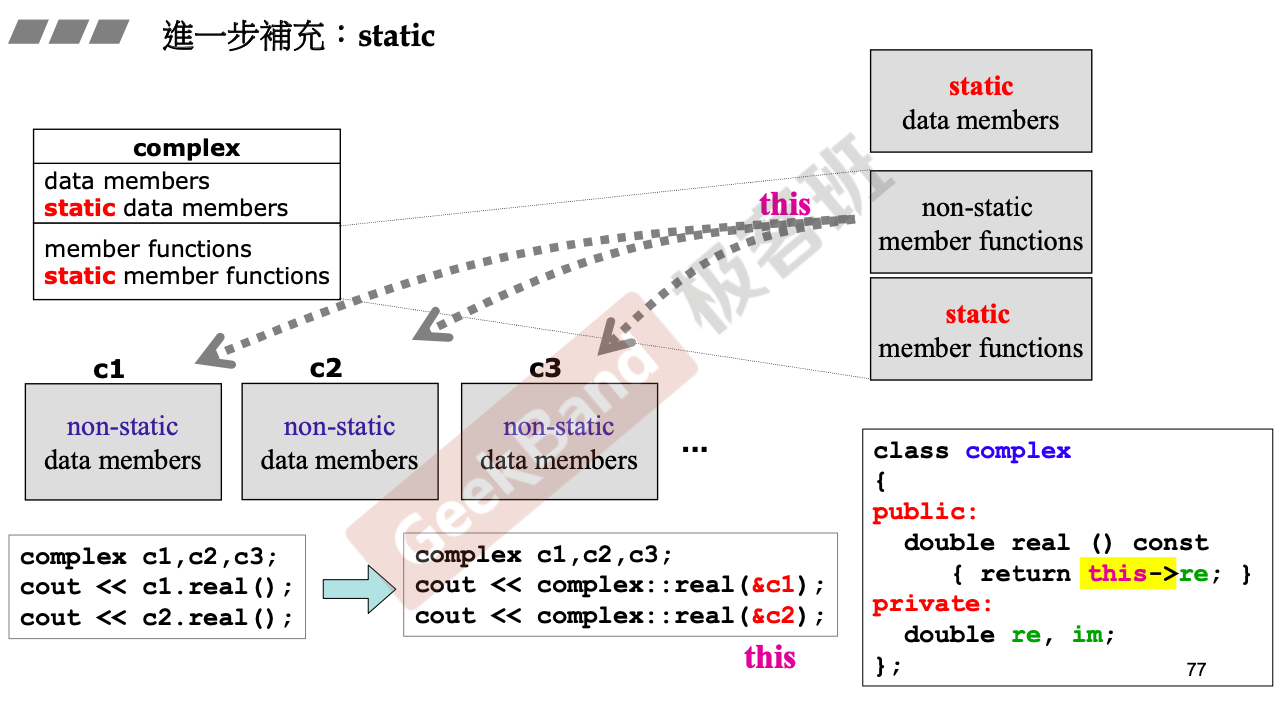
对于非静态成员函数,面对不同的参数值 c1c2c3 需要使用 this pointer。而对于静态的数据永远只有一份,比如设计一个银行账户类,有 100 个人来开户,所以你需要创建 100 个户头出来:c1c2……c100,但有一样东西不应该和账户绑定,就是利率,100 个人用的都是同一份利率,这种情况下就不应该把利率设计为普通的成员数据,而应该设计为只有一份的静态数据。

那什么时候使用静态函数呢?静态函数跟一般成员函数的区别在于静态函数没有 this pointer,可见它不能像一般成员函数一样去访问、存储和处理对象里的东西,显然只能处理静态数据。
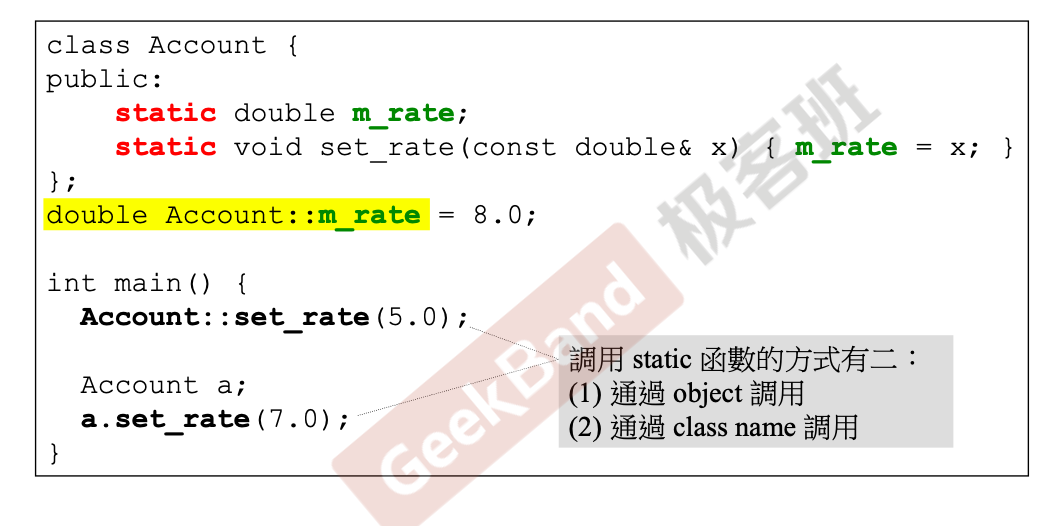
調用 static 函數的方式有二:

  1. 通過 object 調用
  2. 通過 class name 調用

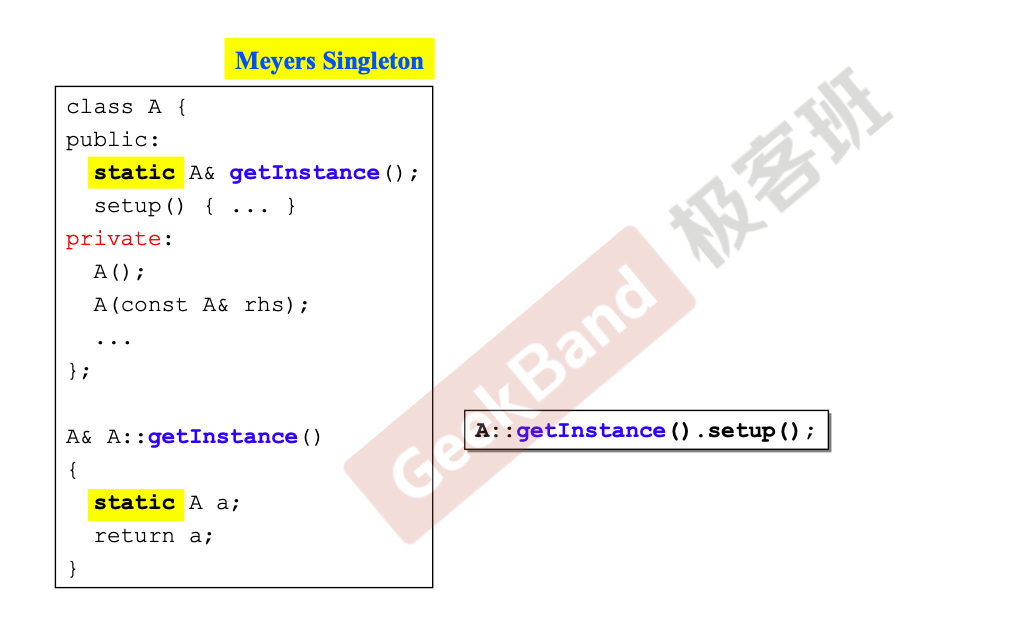
進一步補充: 把 ctors 放在 private 區
1
2
3
4
5
6
7
8
9
10
11
12
13
14
class A {
public:
static A& getInstance();
setup() {...}
private:
A();
A(const A& rhs);
...
};

A& A::getInstance() {
static A a;
return a;
}

先前提过我们写一个类只希望产生一个对象,这里静态就发挥出作用。上面的代码可以看到 a 是唯一的,而只有通过调用静态函数 getInstance() 才能获取 a

这是设计模式中的单例模式,很容易通过静态实现出来。

進一步補充:cout

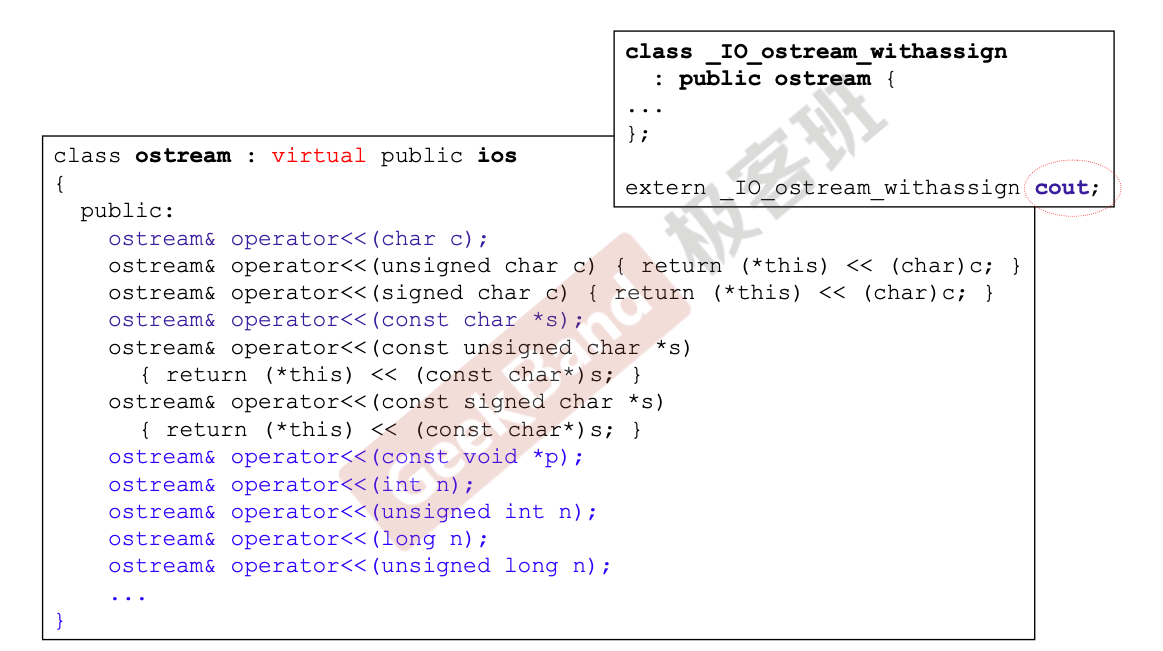
在前面为了验证我们会用 cout 把东西打印出来,也许你会疑惑为什么 cout 可以接收各式各样的数据,你可以把整数、浮点数、字符串都给它打印出来。

如我们所想,它做了很多操作符重载,所以才能接收如此之多的数据。

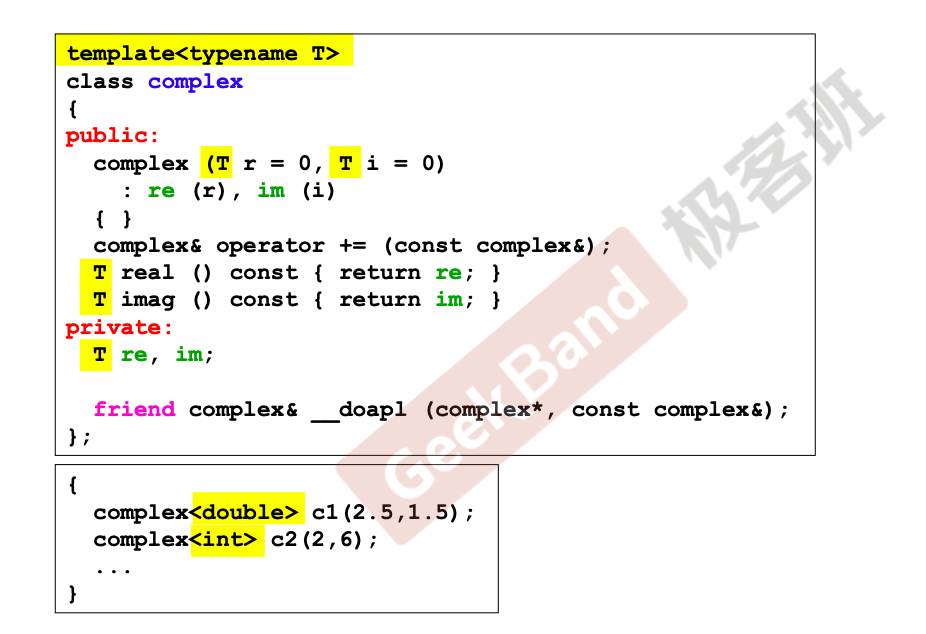
進一步補充:class template, 類模板
進一步補充:function template, 函數模板
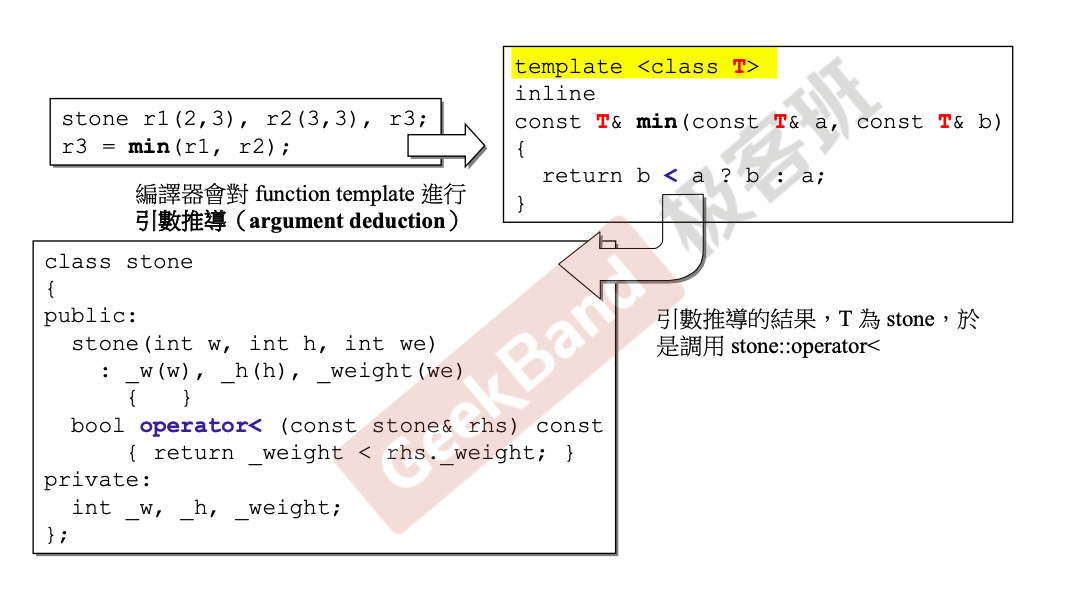
函数模板不必指出使用类型,编译器会做实参推导得到一个函数版本,引數推導的結果,Tstone,於是調用 stone::operator<

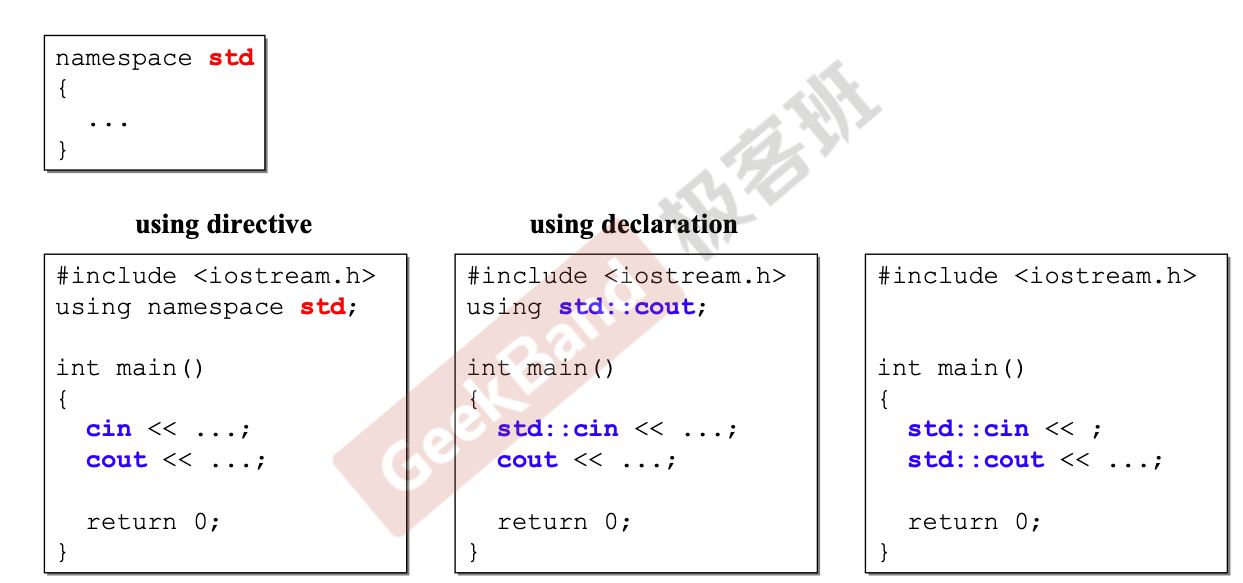
進一步補充:namespace

组合与继承

Object Oriented Programming, Object Oriented Design OOP, OOD

  • Inheritance (繼承)
  • Composition (複合)
  • Delegation (委託)

对于复数或字符串一般不会和其他类发生关系,但一些比较复杂的情况你就需要让类和类之间产生关系,这就叫面向对象编程思想。

Composition (複合), 表示 has-a
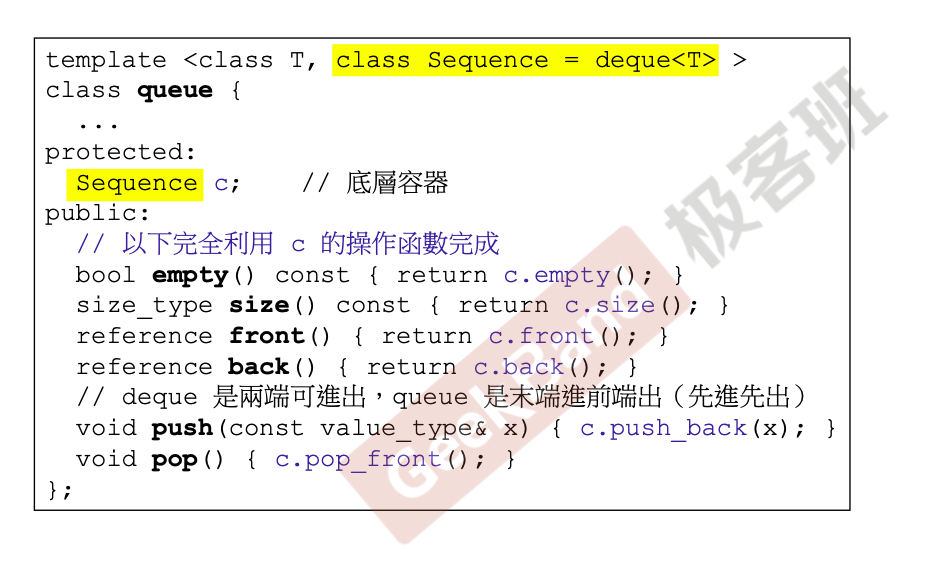
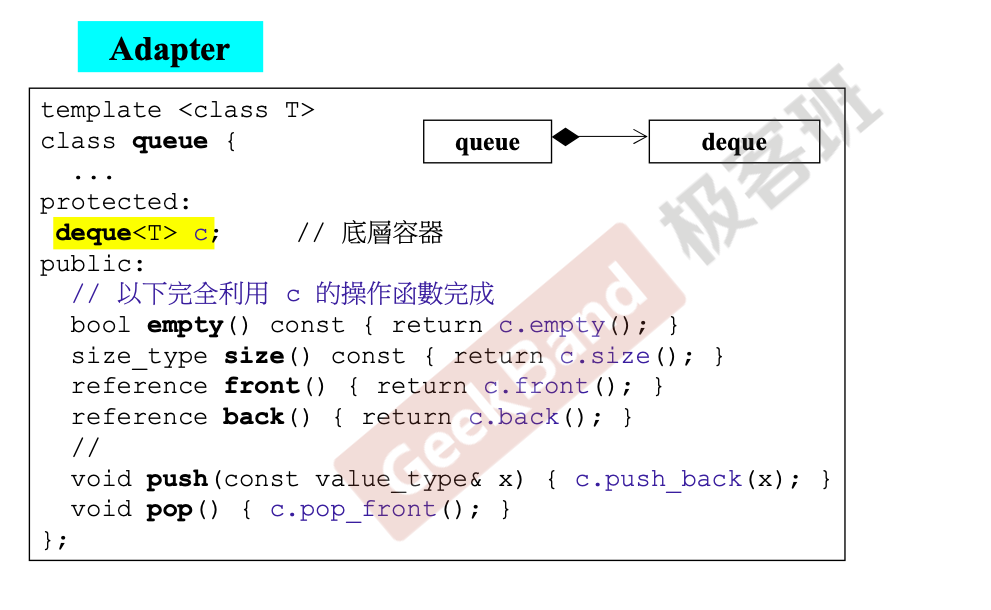
上面是标准库的队列实现,默认 Sequencedeque<T> 类型。

我里面有另外一种东西,称之为复合,表示的是“has a”的关系。很显然这里的 deque 功能非常强大,queue 在其基础上调用操作函数即可。
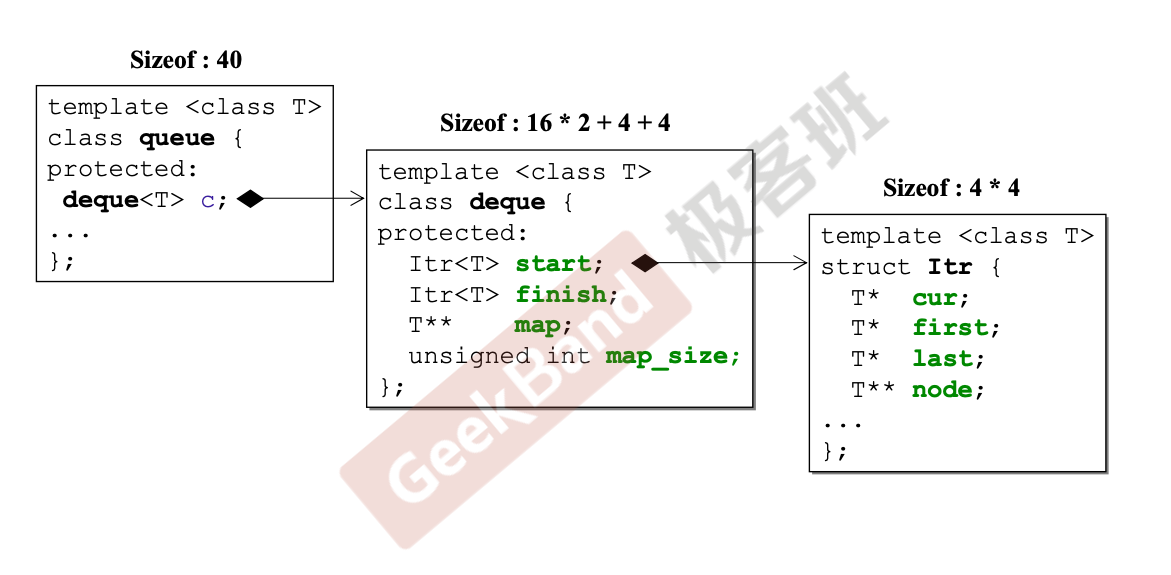
现在我们从内存的角度来看一看。Itr 有 4 个指针 4 * 4 = 16 个字节,而 deque 则有 2 个 Itr 16 * 2 = 32 字节,加上多的 1 个指针 1 个非负整型 4 + 4 = 8,最后得到 40 字节,而 queue 本身只有一个 deque,所以大小也是 40。

Composition (複合) 關係下的構造和析構
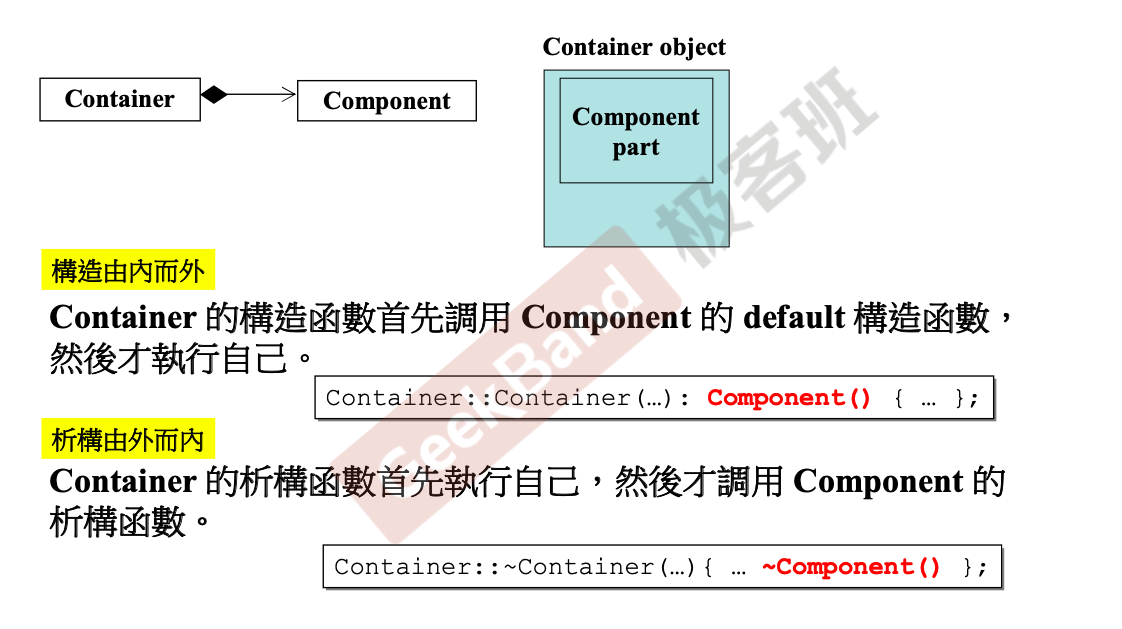
構造由內而外

Container 的構造函數首先調用 Componentdefault 構造函數,然後才執行自己。

1
Container::Container(...): Component() {...};

析構由外而內

Container 的析構函數首先執行自己,然後才調用 Component 的析構函數。

1
Container::~Container(...){ ~Component() };

Delegation (委託). Composition by reference.
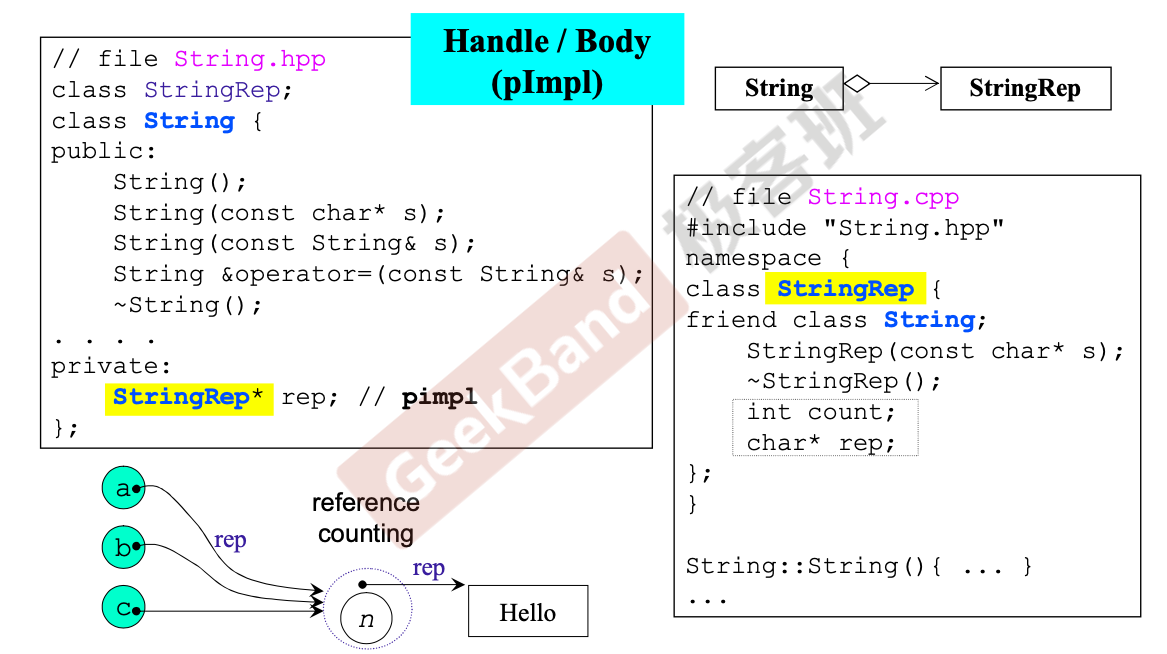
可以看到 String 拥有一个 StringRep 的指针,我们称之为 Delegation (委託)。这一种 pimpl 写法非常有名,字符串的设计不在左边写出来,左边只是对外的接口,设计的实现都在右边写出来,当左边需要动作的时候都调用右边的类的函数来服务。可以看到 Pimpl 拥有如下优点:

  • 减少依赖项(降低耦合性):其一减少原类不必要的头文件的依赖,加速编译;其二对Impl类进行修改,无需重新编译原类
  • 接口和实现的分离(隐藏了类的实现):私有成员完全可以隐藏在共有接口之外,给用户一个间接明了的使用接口,尤其适合闭源API设计
  • 可使用惰性分配技术:类的某部分实现可以写成按需分配或者实际使用时再分配,从而节省资源

Pimpl也拥有一些缺点:

  • 每个类需要占用小小额外的指针内存
  • 每个类每次访问具体实现时都要多一个间接指针操作的开销,并且再使用、阅读和调试上都可能有所不便。

可以说,在性能/内存要求不敏感(非极端底层)的领域,Pimpl 技术可以有相当不错的发挥和作用。

Inheritance (繼承), 表示 is-a
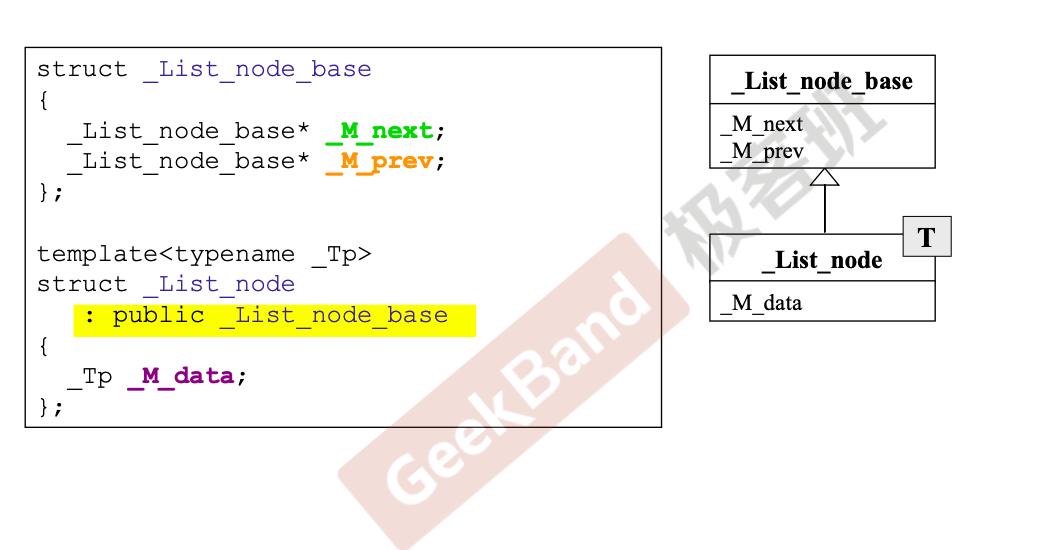
使用 public Inheritance (繼承) 代表“is a”的关系。

Inheritance (繼承) 關係下的構造和析構
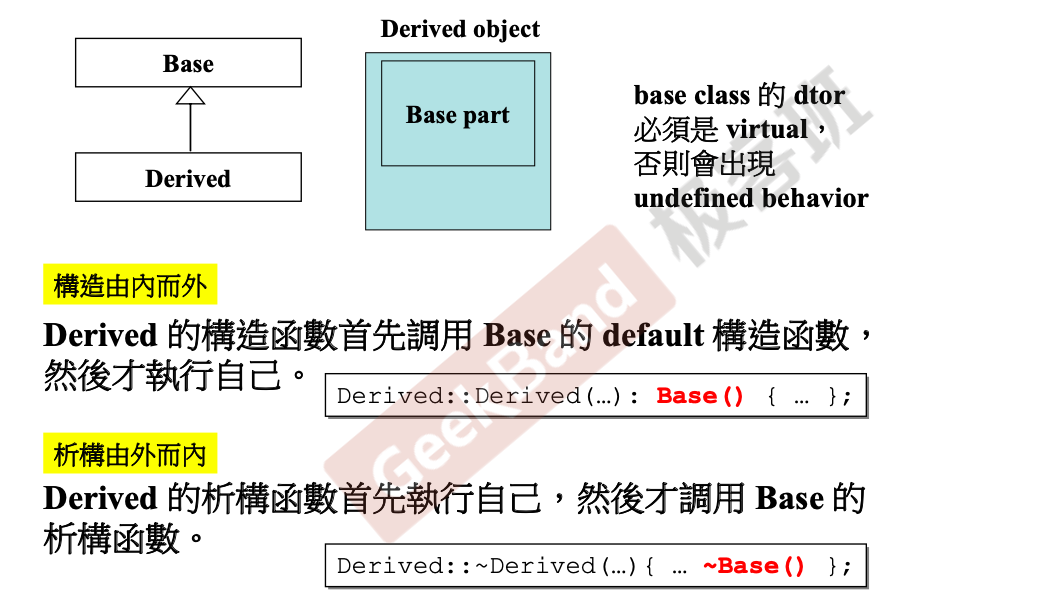
構造由內而外

Derived 的構造函數首先調用 Basedefault 構造函數, 然後才執行自己。

1
Derived::Derived(...): Base() {...};

析構由外而內

Derived 的析構函數首先執行自己,然後才調用 Base 的析構函數。

1
Derived::~Derived(...){ ... ~Base() };

虚函数与多态

Inheritance (繼承) with virtual functions (虛函數)
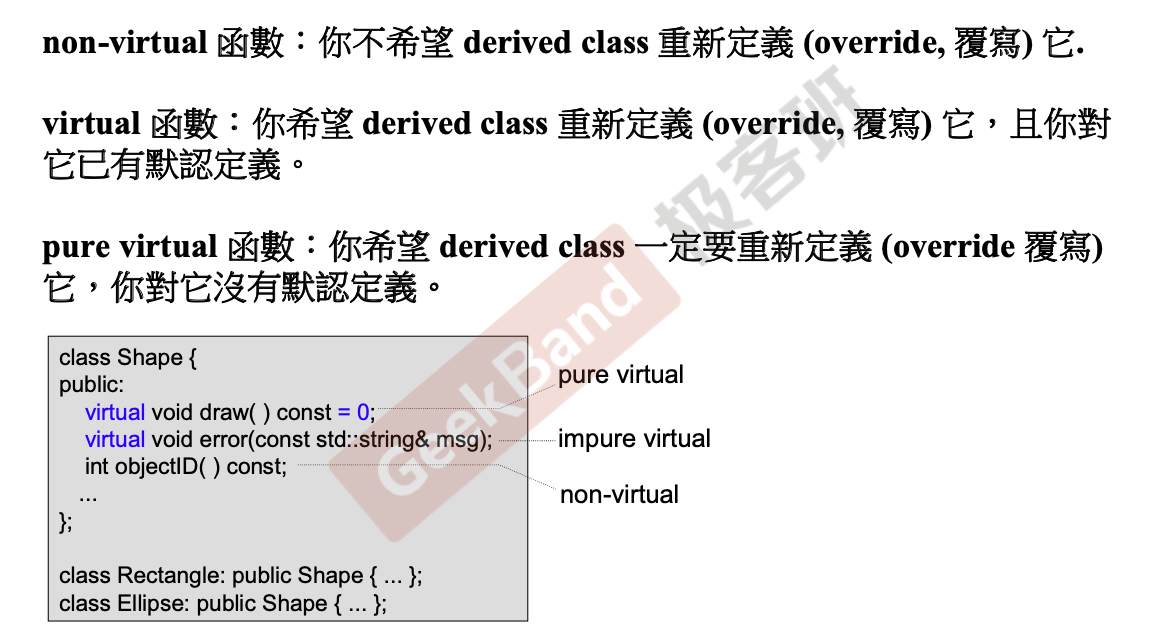
non-virtual 函數:你不希望 derived class 重新定義 (override, 覆寫**)** 它。

virtual 函數:你希望 derived class 重新定義 (override, 覆寫**)** 它,且你對它已有默認定義。

pure virtual 函數:你希望 derived class 一定要重新定義 (override 覆寫**)** 它,你對它沒有默認定義。

Inheritance (繼承) with virtual

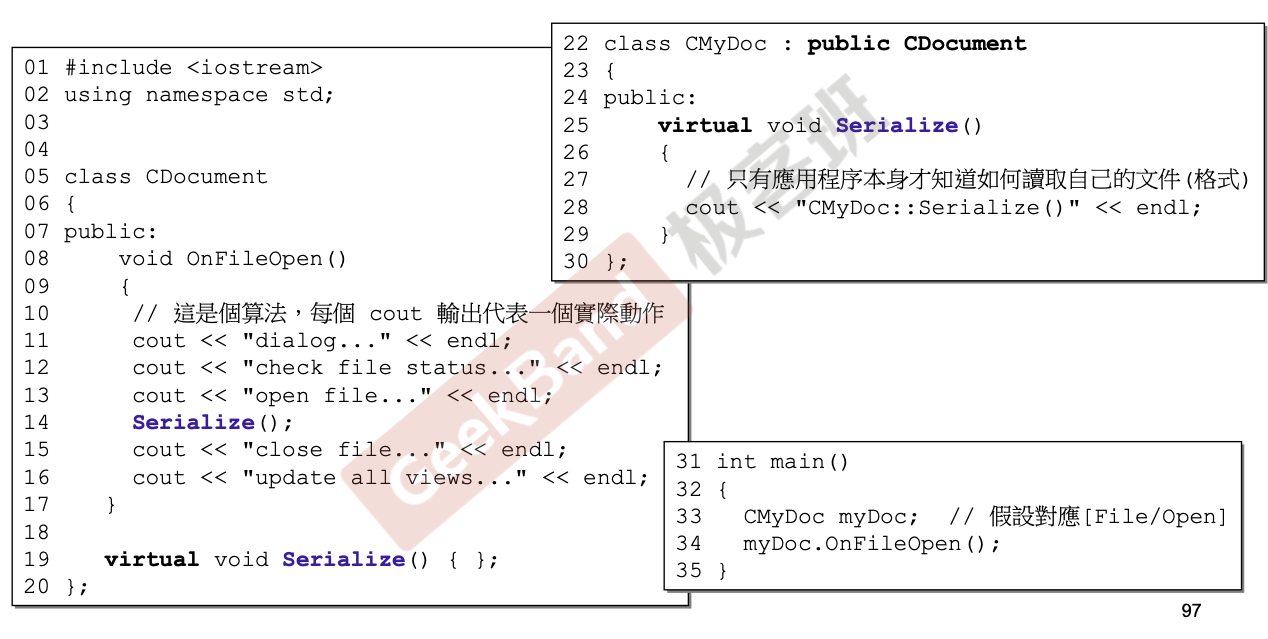
这里我使用 PPT 在菜单栏选择打开文件,弹出的窗口有文件名搜索栏。如果我输入一个文件名,它应该检查文件名是否正确,然后到硬盘里找这个文件在不在,最后把这个文件打开。

在这个流程中除了最后打开文件由于格式不同可能读取存在问题,其他步骤都可以提前写好。
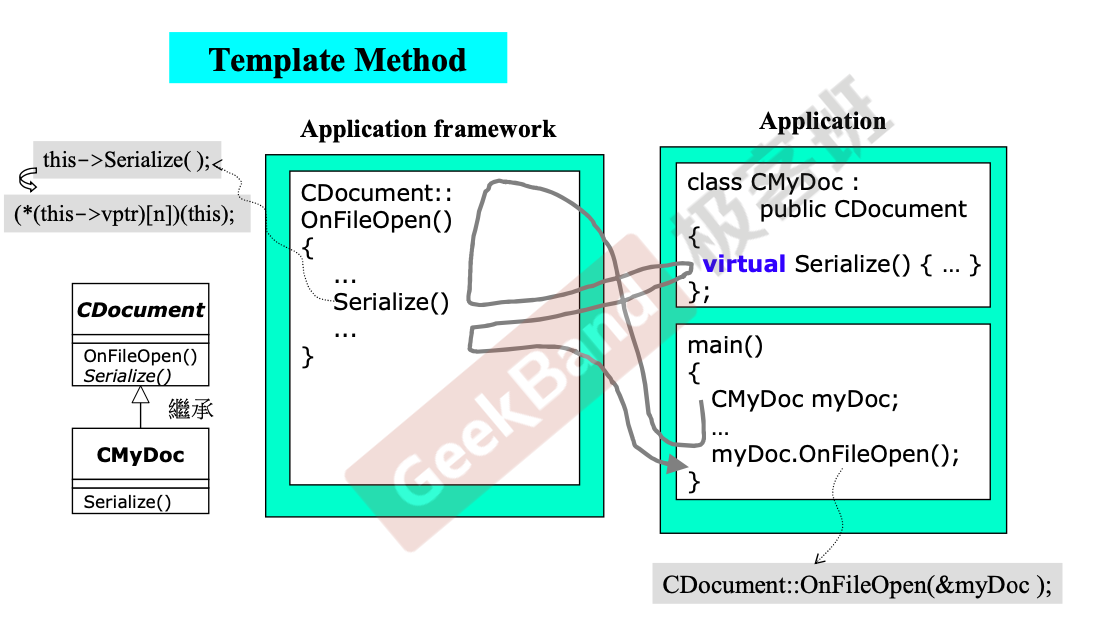
在这个例子中读取文件 Serialize() 是没办法提前写好的,所以我们需要将其设置为纯虚函数或者包含定义的虚函数。
Inheritance+Composition 關係下的構造和析構
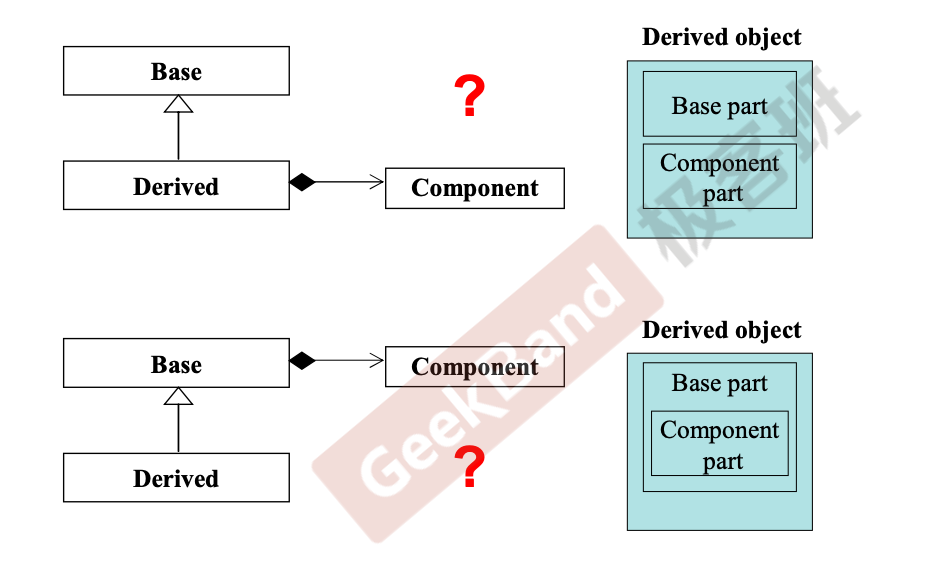
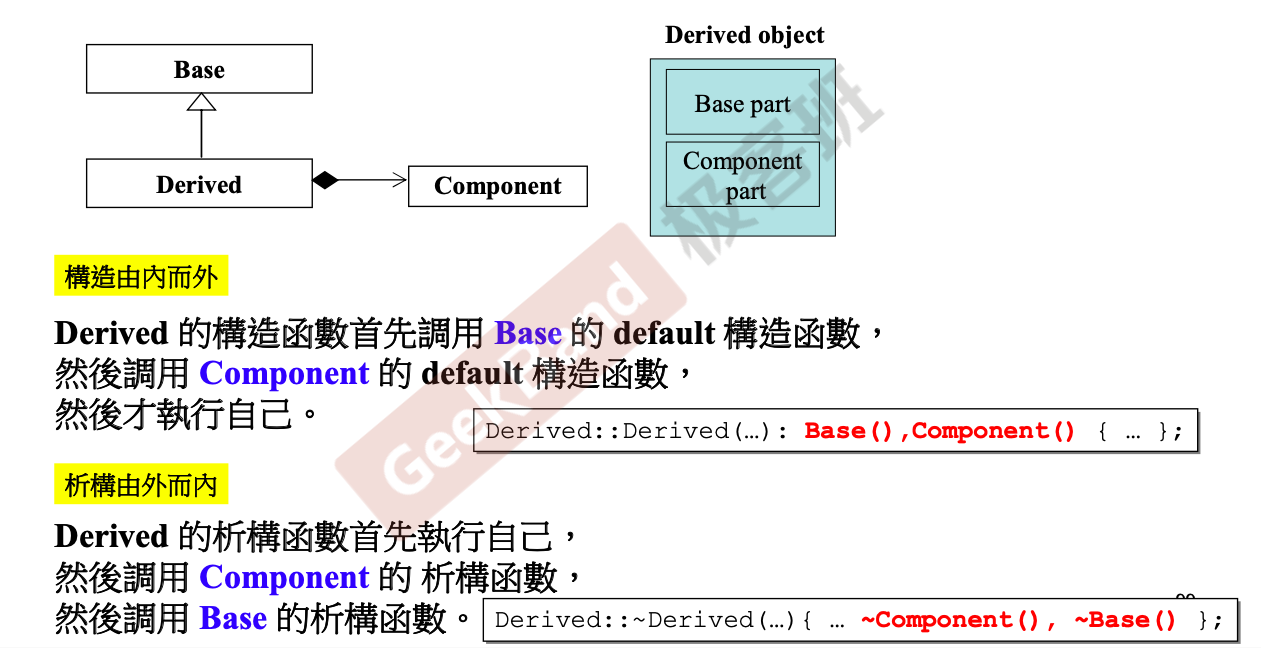
構造由內而外

Derived 的構造函數首先調用 Basedefault 構造函數, 然後調用 Componentdefault 構造函數, 然後才執行自己。

1
Derived::Derived(...): Base(),Component() { ... };

析構由外而內

Derived 的析構函數首先執行自己, 然後調用 Component 的 析構函數,然後調用 Base 的析構函數。

1
Derived::~Derived(...){ ... ~Component(), ~Base() };

委托相关设计

Delegation (委託) + Inheritance (繼承)
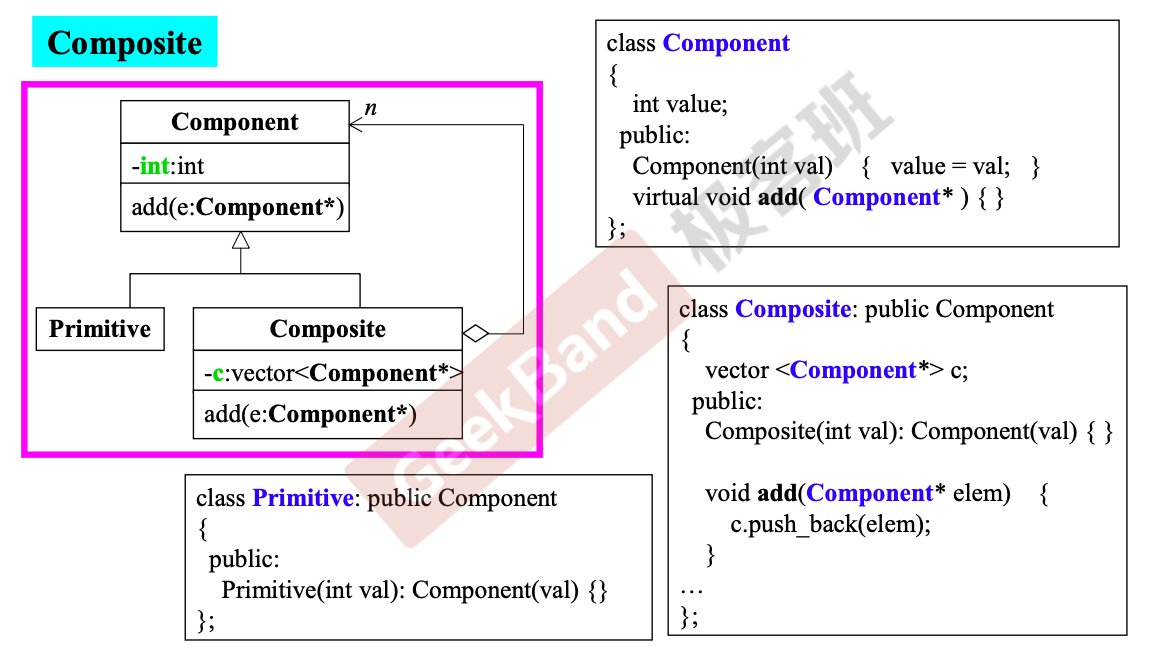
现在我们有了复合、继承和委托三板斧,如果我的任务是做一个文件系统,我们该如何设计呢?现在打开 Windows 窗口系统,都是大窗口里有小窗口,而文件目录可以放文件,还可以与其他目录结合在一起再放到另外一个目录里,现在我们面对的就是这样一种奇特的情况。

首先我们应该有一个代表文件的类 Primitive,另外我也需要准备一个 Composite 组合类。作为 Compostie 应该是一个容器,可以容纳很多个 Primitive,但刚刚我们分析过它也应该能够容纳 Composite 本身,那该如何是好呢?

我们的策略是为左边和右边写一个父类:

  • Primitive is a Component
  • Composite is a Component

这样右边的容器不必写死为 PrimitiveComposite,放入父类指针 Component*。同样,添加功能也需要添加两个类别,所以也放入父类指针 Component*。在设计模式中这种设计方法称为组合模式。
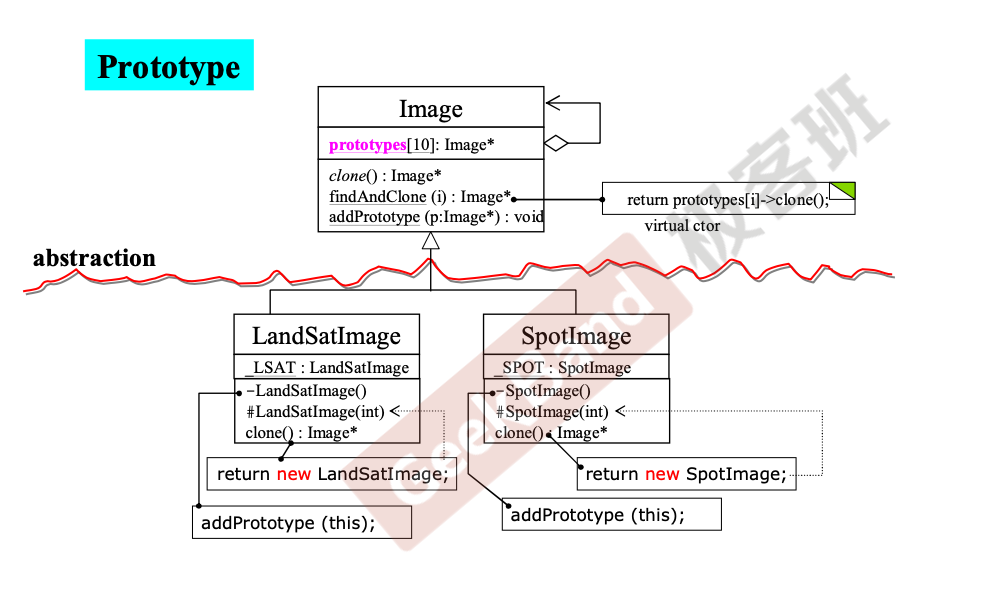
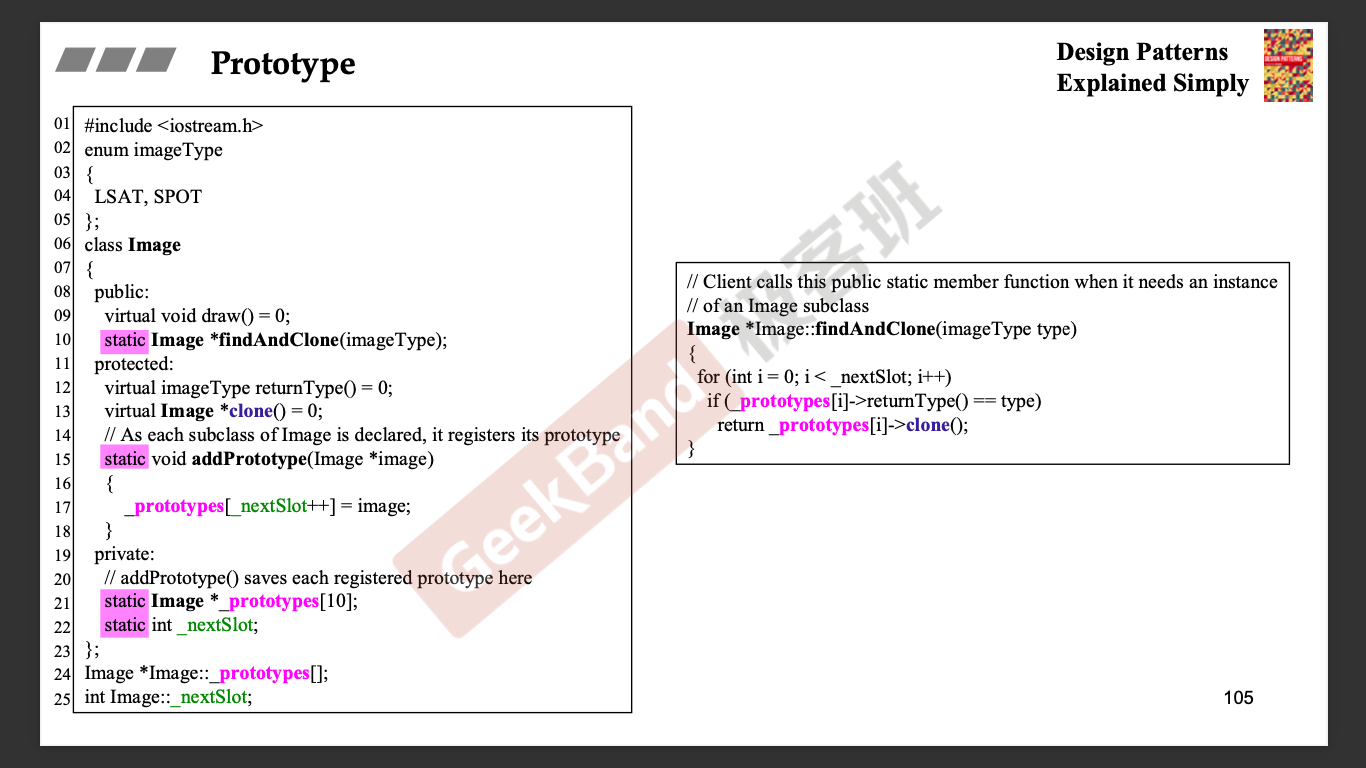
假如我需要一个树状继承体系,创建未来才需要的子类该怎么办?在图中可以看到 Image 是抽象层之上的,下面的 LandImageSpotImage 都是派生下来的子类,这时名称才可能出现,而 Image 可能是我三年前写的。现在的问题是我不知道未来的类有什么,我如何创建它呢?

有些聪明的人想出一个办法,有没有办法让下面派生的子类都创建一个自己作为原型传给父类。只要派生子类创建出来的东西能够被父类看到,就可以当作蓝本不断拷贝。以 LandSatImage 为例,私有的构造函数会调用 Image 父类 addPrototype(this) 使其感知,Image 得到的指针再放到自己的容器数组 prototypes,依此类推。而父类就可以通过之前传递的原型调用子类的 clone() 函数。

有人会说把 clone() 函数设为静态,不需要对象就能够调用它。静态函数的调用一定需要类名称,而未来的类名我们并不知道,所以我们必须舍弃这个想法。这个解法十分精巧,让人拍案叫绝,由《Design Patterns Explained Simply》的作者提出的。

Prototype
1
2
3
4
5
6
7
8
9
10
11
12
13
14
15
16
17
18
19
20
21
22
23
24
25
26
27
28
29
30
31
32
33
34
35
36
37
#include <iostream>

enum imageType {
LAST, SPOT
};

class Image {
public:
virtual void draw() = 0;
static Image* findAndClone(imageType);

protected:
virtual imageType returnType() = 0;
virtual Image* clone() = 0;

// As each subclass of Image is declared, it registers its prototype
static void addPrototype(Image* image) {
_prototypes[_nextSlot++];
}

private:
// addPrototype() saves each registered prototype here
static Image* _prototypes[10];
static int _nextSlot;
};

Image* Image::_prototypes[];
int Image::_nextSlot;

// Client calls this public static member function when it needs an instance
// of an Image subclass
Image *Image::findAndClone(imageType type) {
for (int i = 0; i < _nextSlot; ++i) {
if (_prototypes[i]->returnType() == type)
return _prototypes[i]->clone();
}
}

父类的 clone() 为纯虚函数,它不知道怎么克隆,但它要求子类一定要写出来。

1
2
3
4
5
6
7
8
9
10
11
12
13
14
15
16
17
18
19
20
21
22
23
24
25
26
27
28
29
30
31
32
33
34
35
36
37
38
39
40
41
42
43
44
45
46
47
48
49
50
51
52
53
54
55
56
57
58
59
60
61
62
63
64
65
66
67
68
69
70
71
72
class LandSatImage : public Image {
public:
imageType returnType() {
return LAST;
}

void draw() {
std::cout << "LandSatImage::draw " << _id << std::endl;
}

// When clone() is called, call the one-argument ctor with a dummy arg
Image* clone() {
return new LandSatImage(1);
}

protected:
// This is only called from clone()
LandSatImage(int dummy) {
_id = _count++;
}

private:
// Mechanism for initializing an Image subclass - this causes the
// default ctor to be called, which registers the subclass's prototype
static LandSatImage _landSatImage;

// This is only called when the private static data member is inited
LandSatImage() {
addPrototype(this);
}

// Nominal "state" per instance mechanism
int _id;
static int _count;
};

// Register the subclass's prototype
LandSatImage LandSatImage::_landSatImage;
// Initialize the "state" per instance mechanism
int LandSatImage::_count = 1;


class SpotImage : public Image {
public:
imageType returnType() {
return SPOT;
}

void draw() {
std::cout << "SpotImage::draw " << _id << std::endl;
}

Image* clone() {
return new SpotImage(1);
}

protected:
SpotImage(int dummy) {
_id = _count++;
}

private:
SpotImage() {
addPrototype(this);
}

static SpotImage _spotImage;
int _id;
static int _count;
};
SpotImage SpotImage::_spotImage;
int SpotImage::_count = 1;

1
2
3
4
5
6
7
8
9
10
11
12
13
14
15
16
17
18
19
20
21
22
23
24
25
// Simulated stream of creation requests
const int NUM_IMAGES = 8;
imageType input[NUM_IMAGES] = {
LAST, LAST, LAST, SPOT, LAST, SPOT, SPOT, LAST
};

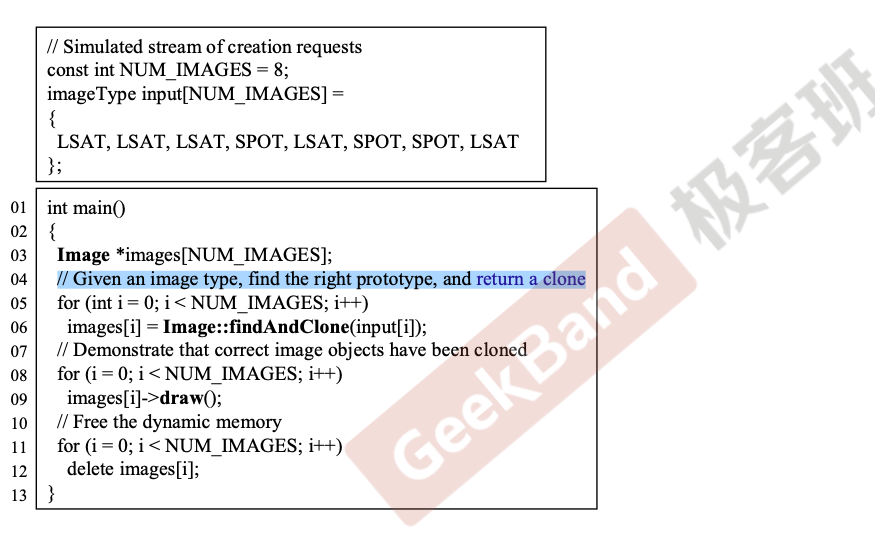
int main() {
Image* images[NUM_IMAGES];

// Given an image type, find the right prototype, and return a clone
for (int i = 0; i < NUM_IMAGES; ++i) {
images[i] = Image::findAndClone(input[i]);
}

// Demonstrate that correct image objects have been cloned
for (int i = 0; i < NUM_IMAGES; ++i) {
images[i]->draw();
}

// Free the dynamic memory
for (int i = 0; i < NUM_IMAGES; ++i) {
delete images[i];
}
return 0;
}

完整的源码:

1
2
3
4
5
6
7
8
9
10
11
12
13
14
15
16
17
18
19
20
21
22
23
24
25
26
27
28
29
30
31
32
33
34
35
36
37
38
39
40
41
42
43
44
45
46
47
48
49
50
51
52
53
54
55
56
57
58
59
60
61
62
63
64
65
66
67
68
69
70
71
72
73
74
75
76
77
78
79
80
81
82
83
84
85
86
87
88
89
90
91
92
93
94
95
96
97
98
99
100
101
102
103
104
105
106
107
108
109
110
111
112
113
114
115
116
117
118
119
120
121
122
123
124
125
126
127
128
129
130
131
132
133
134
135
136
137
138
139
140
#include <iostream>

enum imageType {
LAST, SPOT
};

class Image {
public:
virtual void draw() = 0;
static Image* findAndClone(imageType);

protected:
virtual imageType returnType() = 0;
virtual Image* clone() = 0;

// As each subclass of Image is declared, it registers its prototype
static void addPrototype(Image* image) {
_prototypes[_nextSlot++] = image;
}

private:
// addPrototype() saves each registered prototype here
static Image* _prototypes[10];
static int _nextSlot;
};

Image* Image::_prototypes[];
int Image::_nextSlot;

// Client calls this public static member function when it needs an instance
// of an Image subclass
Image* Image::findAndClone(imageType type) {
for (int i = 0; i < _nextSlot; ++i) {
if (_prototypes[i]->returnType() == type)
return _prototypes[i]->clone();
}

std::cerr << "Wrong Image Type\n";
return nullptr;
}


class LandSatImage : public Image {
public:
imageType returnType() {
return LAST;
}

void draw() {
std::cout << "LandSatImage::draw " << _id << std::endl;
}

// When clone() is called, call the one-argument ctor with a dummy arg
Image* clone() {
return new LandSatImage(1);
}

protected:
// This is only called from clone()
LandSatImage(int dummy) {
_id = _count++;
}

private:
// Mechanism for initializing an Image subclass - this causes the
// default ctor to be called, which registers the subclass's prototype
static LandSatImage _landSatImage;

// This is only called when the private static data member is inited
LandSatImage() {
addPrototype(this);
}

// Nominal "state" per instance mechanism
int _id;
static int _count;
};

// Register the subclass's prototype
LandSatImage LandSatImage::_landSatImage;
// Initialize the "state" per instance mechanism
int LandSatImage::_count = 1;


class SpotImage : public Image {
public:
imageType returnType() {
return SPOT;
}

void draw() {
std::cout << "SpotImage::draw " << _id << std::endl;
}

Image* clone() {
return new SpotImage(1);
}

protected:
SpotImage(int dummy) {
_id = _count++;
}

private:
SpotImage() {
addPrototype(this);
}

static SpotImage _spotImage;
int _id;
static int _count;
};
SpotImage SpotImage::_spotImage;
int SpotImage::_count = 1;

// Simulated stream of creation requests
const int NUM_IMAGES = 8;
imageType input[NUM_IMAGES] = {
LAST, LAST, LAST, SPOT, LAST, SPOT, SPOT, LAST
};

int main() {
Image* images[NUM_IMAGES];

// Given an image type, find the right prototype, and return a clone
for (int i = 0; i < NUM_IMAGES; ++i) {
images[i] = Image::findAndClone(input[i]);
}

// Demonstrate that correct image objects have been cloned
for (int i = 0; i < NUM_IMAGES; ++i) {
images[i]->draw();
}

// Free the dynamic memory
for (int i = 0; i < NUM_IMAGES; ++i) {
delete images[i];
}
return 0;
}